Operation Goodwood for BBWW2B
18/7/44
V2.3
Operation Goodwood was the British plan to breakthrough the German defences to the east of Caen. Unlike the majority of offensives in Normandy it was spearheaded by the British armour not their infantry. The infantry divisions, and the infantry components of the armoured divisions, were relegated to holding the flanks of the armoured thrust.
The attack was not an assault by three armoured divisions but an assault by three armoured brigades with the scantiest infantry support: 29th Armoured Brigade of the 7th Armoured Division in the lead; 5th Guards Armoured Brigade of the Guards Armoured Division next and 22nd Armoured Brigade of the 7th Armoured Division a distant third.
The offensive was launched from a very congested bridgehead over the Orne Canal. This, combined with the limited routes available through the British minefields, meant that a three "division" offensive was actually fought on a frontage of four armoured squadrons. The trailing brigade of the 7th Armoured Division barely making it to the battlefield on the first day and making so little impact this scenario ignores its presence.
To make up for the lack of infantry the British tried to substitute firepower. 100's of British and US heavy bombers pulverised the battlefield with 7700 tons of bombs and 2 AGRA's fired an elaborate fire program including 760 artillery pieces. Initially this worked very well.
In front of the attack was the depleted 16 Feld Division (Luftwaffe), a mediocre unit that crumbled under the relentless bombardment. However the British grossly underestimated the depth of the German defences. They were aware that elements of 21 Panzer Division were in the area but not how far back their defences went. They also underestimated the division's strength. The British were also unsure of the exact location of 1SS Panzer Division.
The depth of the defences were to cause many problems. The bombing didn't touch large portions of 21 Panzer and completely missed 1SS LSSAH. Because of the the congested bridgehead over the Orne many of the British 25pdrs were further back than was ideal. They were out of range when the British came to assault the Borgebus Ridge, leaving the attack bereft of support at a critical time.
The scenario starts at 10:00am. At this point everything is going well for the British, though they are a little behind schedule and the 7th Armoured Division has yet to leave the bridgehead. However they are about to meet the parts of 21 Panzer untouched by the bombing, and those parts that were hit are starting to reorganise and offer increasing resistance. The first hint that all was not well was the destruction of C Squadron 2nd Fife and Forfarshire Yeomanry by the 88mm in Cagney.
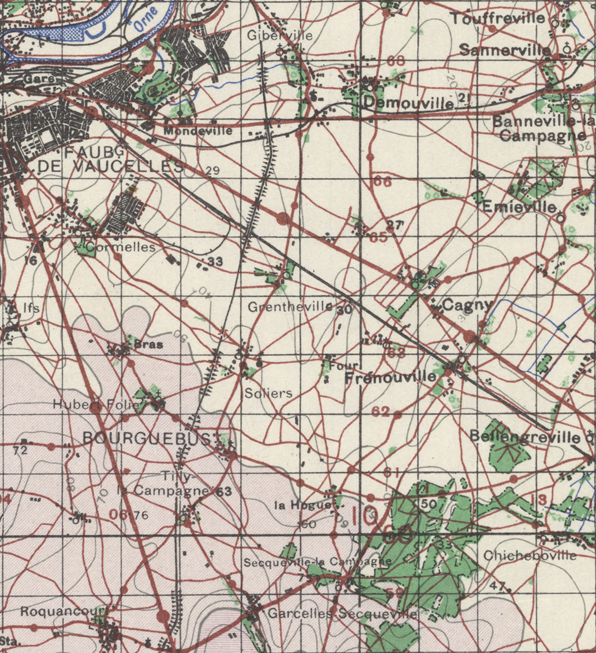
French wartime map of the battle area from: http://digitalarchive.mcmaster.ca/islandora/object/macrepo:8802
Map and Order of Battle
British Deployment
29th Armoured Brigade mostly starts on table in its deployment zone delineated by the dashed pink line. However the 2nd Northamptonshire Yeomanry is a reinforcement. At the start of turn 6 it can be placed anywhere in the yellow zone on the map
A & D Squadrons Inns of Court are reinforcements on turn 2 arriving between points A & B
5th Guards Armoured Brigade is a reinforcement on turn 2 arriving between points A & B
5th RTR is a reinforcement on turn 5 arriving between points A & B
159th Infantry Brigade is a reinforcement. At the start of turn 5 its constituent units can be placed anywhere in the yellow zone on the map.
German Deployment
Stab KG Luck is deployed in or touching Frenouville
I & II Abt KG Luck, is deployed on table in the area delineated by the pink dashed lines
200 StuG Abt and 16 Luftwaffe Art Regt share the same deployment zone, shown by the pink dashed lines. The guns of the 16 LAR can not be deployed touching a village template. The 16 LAR is dug in entrenchments (2 Left Shift)
The I/9 Werfer Brigade can be deployed within 6" of Gentheville or Soliers but not further north or west than the railway lines. The battalion is dug in entrenchments (2 Left Shift)
220 Pioneer Abt is deployed within 6" of La Hogue
200 Panzerjäger Abt is deployed touching road GJ
II & III Abt 155 Artillerie Regiment may be deployed anywhere south of road FJ
21 Panzer Div Stab arrives on tale turn 2 within 6" of point H
503 Pz Abt is a reinforcement arriving turn 3 between points C & D
4 & 5 Aufklarungs Kompanie are reinforcements arriving turn 3 within 6" of road G
305 FlaK Abt is a reinforcement arriving turn 3 between points G & H
I/1 SS Panzer Regiment arrives turn 4 between points I & K
1039 Art PzJgr Abt is a reinforcement arriving turn 5 between points C & D
Terrain
The map is 4ft x 5ft scaled at 3" = 1km. North is towards the top of the page
The open terrain is farmland, for the most part without significant field boundaries
The brown areas are Suburban BUA
The dark green area is a managed wood
The light green areas are patchy orchards and fields filled with bomb craters.
Red lines are roads, they have no game effect
The black dashed lines are railways. For the the most part they have no game effect, however where the railway is bordered by brown dots its is raised on an embankment.
The brown dashed lines are ridgelines, which break LOS. The thick ridgelines are level 2 the thing lines are level 1.
|
Terrain |
Movement |
Cover |
ZOC |
Fire Power |
||||||
|
Leg/non-motorised |
Wheels/ motorised |
Tracked/ mechanised |
Inf & Cav |
Towed Guns |
Vehicle |
Inf & Cav |
Towed Guns & Vehicles |
IDF |
||
|
BUA Suburban |
Difficult |
Difficult |
Difficult |
2L |
1L |
1L |
Cluttered |
- |
1R |
Zero |
|
Cratered Fields |
Difficult |
Difficult |
Difficult |
2L |
1L |
1L |
Clear |
- |
- |
- |
|
Open |
- |
- |
- |
- |
- |
- |
Clear |
- |
- |
- |
|
Woods Managed |
Difficult |
Difficult |
Difficult |
1L |
1L |
1L |
Cluttered |
- |
- |
Zero |
|
Terrain |
Movement |
Cover |
ZOC |
Firepower |
||
|
Leg/non-motorised |
Wheels/ motorised |
Tracked/ mechanised |
||||
|
Bridge & Defile |
Obstacle |
Obstacle |
Obstacle |
- |
- |
1R |
|
Embankment Steep |
Pure |
Impassable |
Impassable |
- |
Cluttered** |
- |
|
Ridgelines |
- |
- |
- |
- |
Cluttered |
- |
Air Support
Only the British get air support, though most was tasked with attacking targets in depth and was not present over the battlefield.
The British player rolls for air support every turn using 2d6: 9-10: 1 Typhoon or Tempest. 11-12: 2 Typhoons or Tempests.
Special Rules
The game starts runs for 9 turns.
The British make the first move
The I/9 Werfer Brigade and the 16 LW artillery starts the game disrupted.
The yellow area on the map is out of play until the 159th Infantry Brigade is deployed. Treat its edges as a table edge up to that point.
All the villages have small German garrisons. British pure armour stands may not enter them unless they either: spend one move halted and adjacent to the village, or there is a "real" unit within which they have close assaulted and defeated. In either case the village is marked as cleared and provided no further impediment to the British. (this represents the small British infantry contingent attached to the tank units clearing the villages)
The Tiger battalion is rated as tactically incompetent as the allied bombing knocked all the gun sights out of alignment.
Victory Conditions
If the British have a regimental base touching road JG or south of it, at the end of the game they win.
If the British have 3 or fewer, non spent, regimental bases south of railway LF, and they have not won, at the end of the game the Germans win.
Otherwise the game is a draw.
References
21 Panzer Division, Jean Claud Perrigalt
CAB 44/249 Operation Goodwood, the War Office. (Published by MLRS Books)
Fire Brigades, The Panzer Divisions 1943-45, Kamen Nevekin
Normandy 1944, Niklas Zetterling
Tigers in Combat II, W. Schneider
Operation Goodwood, Ian Daglish