Hannut Day 2 - Battle of the Gette River
13/5/40
v1.2 - updated turn length
After the clash between the 4 Panzer Division and the lead elements of the 3e DLM on the 12th (see here) it was the turn of the 3 Panzer Division to try their luck. Things didn't look good for the 3e DLM. It faced the renewed onslaught of two panzer divisions supported by a swarm of Stukas. However it needed to hang on to give the French infantry at Gembloux time to dig in and prepare for the German assault.
This scenario depicts the attack of the 4 Panzer Division against the middle of the 3 DLM's position.
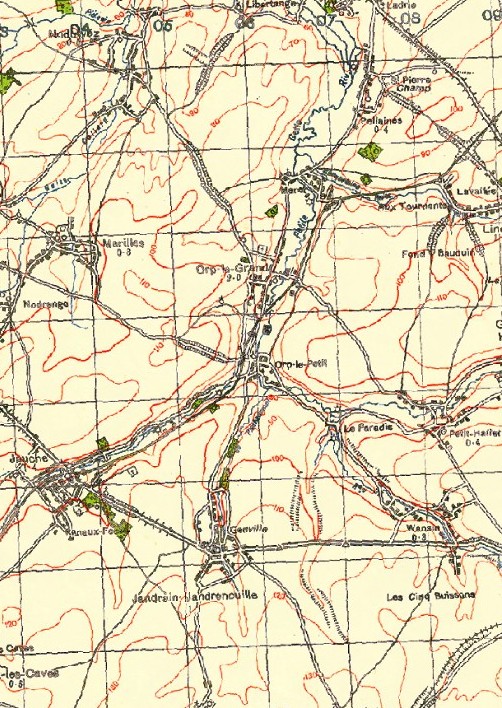
WW2 era map of the battlefield - from http://geo.nls.uk/maps/index.html
Pictures from the modern day battlefield
Map and Order of Battle
French Deployment
The majority of French units start on table in the deployment zones indicated by the pink hashed lines
The Pelton de Commandment de 5e BC and PC de 1RC must start in, or touching, a BUA of Jauche
The Pelton de Commandment de 6e BC must start within 6" of point I
The 2e Escadron 1er Cuirassiers is a reinforcement. It will enter the table between points H & I the turn after the first German units cross the Gette.
The 4e Escadron 1er Cuirassiers is a reinforcement. It arrives turn 6 between points A & B
German Deployment
All German forces start off table.
I & II Abt 5 Panzer Regt enter the table turn 1 between points C&D
I & II Abt 6 Panzer Regt enter the table turn 1 between points D&E
Stab 5 Panzer Regt enters turn 2 between points C&D
Stab 6 Panzer Regt enters turn 2 between points D&E
I Bataillon 3 Schützen Regt enters turn 3 between points C&D
I Bataillon 3 Schützen Regt enters turn 3 between points D&E
Brigade Stab enters turn 4 between points C&E
3 Kp 39 PzJgr Abt enters turn 4 between points C&D
1 Kp 39 PzJgr Abt enters turn 4 between points D&E
3Kp 35Pz Regt enters turn 6 between points G&F
35 Aufklärungs Abt enters turn 7 between points C&E
Reinforcements
No reinforcement can arrive within12" and LOS of an un-demoralised enemy stand. If entry is impossible, the reinforcements can enter a turn later up to 12" from their indicated entry location. If entry is still impossible move 12" further away every turn until entry is possible.
Terrain
The table is 12' x 6' if playing at 1" = 50m. North is towards the top of the page
The open ground is very open. Fields with no cover at their boundaries
Red lines are roads. Any stand on the road is assumed to touching any adjacent to the tree line
Pink hashed lines are tracks, they have no game effect
Brown dots adjacent to a track or road indicate it is sunken. Stands in the sunken road/track can not be seen or shot at from outside unless the observer is touching the edge of the lane. Personnel can fire out of the sunken lane, at targets not touching the edge, vehicles can not. Firing against personnel on the edge of the lane gets -2 cover against direct fire. Personal must be clearly designated as firing out otherwise they are assumed to be cowering in the lane and can not be shot at except by stands touching the edge of the line or within it. All stands may fire out of the lane at enemy touching the edges of the lane. Max LOS along the sunken lanes is 6". Infantry stands can scrabble across the lanes without penalty. Vehicles and man-handled guns can not enter or exit the lane from the sides. If a vehicle is disabled in the lane the lane is blocked. Stands in the lane do not block the fire of stands outside the lane (i.e. you can fire over them).
The dark blue line is a river. Tracked vehicles and personnel take 2 BMA to cross. Pz-III, Pz-IV and the French tanks may find crossing difficult. On a roll of 1-3 they fail and must try again next turn unless there is a friendly engineer stand adjacent to the crossing point. The stream is impassable to wheeled vehicles, halftracks and man handled guns. The light blue lines are brooks. Infatry and tracked vehicles can ignore the brooks. Wheeled vehicles and manhandled guns take a BMA to cross. The river and brooks are tree lined along their entire length. The tree lines break LOS and give -1 cover. The trees and stream are considered one obstacle, so any stand touching the tree line is considered in LOS through the tree line.
Brown dotted lines are ridgelines. They break LOS and give AFV's the benefit of hull down (-2)
The black dotted line is a railway. If a stand is touching the railway and not on it, it gets -1 cover from small arms fire across the the railway
The green dotted lines are tree lines. The tree lines break LOS and give -1 cover
The green areas are open woods.
The large grey squares are 4x4 stone BUA's. They give -3 cover to personnel and -1 cover to towed guns and vehicles. There are no ROF restrictions.
The small grey BUA is a farm, it can take one personnel stand only (not towed gun) and gives -3 cover
The grey broken lines along some of the roads are walls. They give -3 cover to personnel stands and -1 cover to towed guns and vehicles; only if the stand is adjacent to the wall . The walls break LOS, though stand adjacent to the wall can see and be seen. All stands on the road are considered adjacent to the wall. (in reality the walls are actually a line of houses along the road, but there are not enough to warrant a BUA. The walls are an attempt to simulate this)
The red arrows indicate photo locations
Air Support
The Luftwaffe swarmed over the battlefield all day. There were a handful of French air missions but they were inconspicuous compared to the Germans.
Each turn the German player rolls 1d10: 1-6 nothing, 7: Ju-87B, 8 Bf-109E fighter, 9 Ju-87B and Hs-123, 10: Bf-109E fighter, Ju-87B and Hs-123
Each turn the French player rolls 2d10. One is for a MB.152 Fighter the other for a Br.693 Attack. On a 10 the plane arrives and the dice is discarded (ie each plane only turns up once). The French fighter may not make strafing attacks
Special Rules
The game starts at 12:30pm and lasts 11-12 turns. At the end of turn 11 roll 1d10, on a 6+ the game continues to turn 12
The tanks of 3Kp 35Pz Regt can not move north of the Hannut road (XY) they don't contribute to the victory conditions
Victory Conditions
The Germans are trying to capture a bridge and exit panzers off the north west table edge
In order to gain any sort of victory at the end of the game the Germans must be able to trace a road route from the south-east table edge to either road exit H or X . In order for a route to count there must be no French stands in good morale touching the route
If the Germans fail to secure a route the French get a decisive victory
In order to score a decisive victory the Germans must exit 18 panzers off the table between I and X (assuming the Germans have secured a route)
A marginal victory is scored by exiting between 13 and 17 panzers (assuming the Germans have secured a route)
If between 9 and 12 panzer exit it is a draw (assuming the Germans have secured a route)
If 8 or less panzers exit it is a French marginal win (assuming the Germans have secured a route)
Panzers only count towards the totals if they exited in good morale. Departed panzers will not return to the table
Panzers that exit turn 5 or earlier count double. Those exiting on turn 11 or 12 count half
Good morale means not shaken and not demoralised. The SdKfz-221 is not a panzer
References
3e DLM & 11e RDP: http://www.tanaka-world.net/?p=3
3 Panzer Division: http://niehorster.orbat.com/011_germany/40_organ_army/div-pz_03.html
35 Infanterie Division: http://www.wehrmacht-awards.com/forums/showthread.php?t=226656
GCI/1: http://www.cieldegloire.com/004_coutaud_g.php
Panzertruppen Vol 1, T. Jentz
The French Cavalry Corps in WW2: http://www.axishistory.com/index.php?id=6699
WW2 Day by Day (archive): http://web.archive.org/web/20050109011604/chrito.users1.50megs.com/1940/mai/13mai40west.htm