Landings at Hythe
26/9/40
(Scenario update pending)
The Germans, having wrested the skies from the RAF, and packed very last available U-boat around the RN's bases, launched their long anticipated invasion of Britain on the 26th of September 1940. Transport Fleet B landed the 17 Infanterie Division around Hythe. The invasion had started.
The scenario is based off the the official German plans for the invasion and the British defences are accurate.
Note: this is a large complex game, using many "chrome" rules such as paratroopers, especially the 8ft x 5ft version. Its not recommended for beginners!
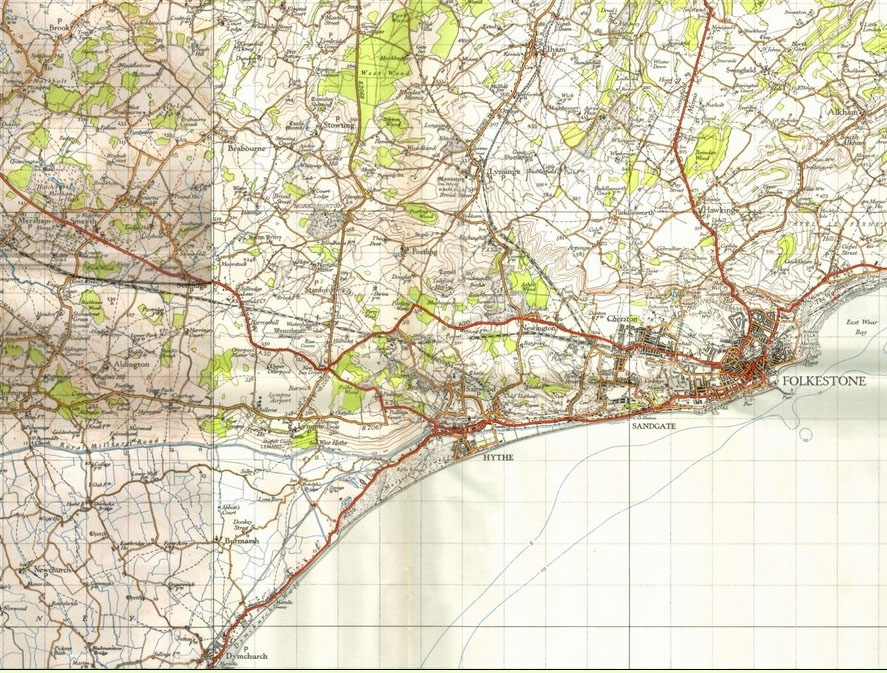
1940's OS map of the battle area from: http://www.npemap.org.uk/tiles/map.html#616,135,1
Map and Order of Battle
Note on Game Size
The scenario can be played two ways: big (8ft x 5ft) or small (6ft x 4ft). The black dotted line shows the outline of the 6x4 table.
Units denoted in italics on the OB do not appear in in the small game
Allied Deployment
Allies deploy first and move second
Some of the deployment locations are not very well defined on the map, for example the Brigade HQ of the 2nd London Infantry Brigade. It is suggested that a house or haystack model is placed at the nominal deployment location on the table, to avoid confusion on the day of the game.
Large Game Only
Brig HQ, 2nd London Infantry Brigade and its associated
logistics are deployed within 12" of the point shown on the map. they can be
in different locations.
1st London Rifle Brigade (1 LRB) is deployed anywhere touching the
Lyminge-Cheriton railway.
1st Queens Westminster Rifles (1 QMR) Mobile Column, is a reinforcement arriving
turn 4 on the north edge within 12" of point B in the large game.
1st Queens Westminster Rifles (1 QMR) (-), is a reinforcement arriving turn 5 on
the north edge within 12" of point B in the large game.
2/5th Queens (+) is a reinforcement arriving turn 6 on the north edge
within 12" of point B in the large game.
C4 & C5 Mobile Battery is a reinforcement arriving turn 6 on the north
edge within 12" of point B in the large game.
Brigade AT Battery is deployed within 12" of the point shown on the map
but must be touching the road
The 4 Sections 501st Field Company RE are each deployed touching one of
the bridges over the Royal Military Canal touching on the north side. One
section per bridge - see special rules. Note these units do not have standard
unit bases and are represented by a pillbox model which in effect acts as the
unit base.
All units of the 6th Field Regiment RA are deployed within 12" of the
point shown on the map. they can be in different locations. The guns are in
support of the infantry and HQ of the 2nd London Infantry Brigade (not C4 & C5,
brigade AT or 501st RE)
B Coy 6th Somerset Light Infantry is deployed in or touching Dymchurch. It is entrenched (2L).
C Coy 6th Somerset Light Infantry is deployed in Burmarsh which is a fortified nodal point (3L) - see special rules
D Coy 6th Somerset Light Infantry is deployed on the
escarpment within 6" of the point shown on the map. It is entrenched (2L).
Recce 6th Somerset Light Infantry is deployed within 12" of Burmarsh
D Coy 18th Royal Fusiliers is deployed on the ridgeline north west of
point F. It is entrenched (2L).
B Coy Kent Home Guard is deployed in Sellindge which is a fortified nodal
point (3L) - see special rules
5th Stevedore Battalion (-) is deployed in or touching Hythe or Saltwood
Detachment 5th Stevedore Battalion (-) is in Dymchurch Redoubt (4L) - see
special rules
Small Arms School is placed between Dymchurch Redoubt and
Hythe but not touching either. it must be at least partially south of the road.
37th Super Heavy Battery RA must be straddling the railway between
Lyminge and Elham. It is in support of the beaches (see special rules).
The units at RAF Lympne and RAF Hawkinge are placed in or touching
the BUA representing the buildings. They are in pillboxes (2L)
Small Game Only
Brig HQ, 2nd London Infantry Brigade and its associated
logistics are deployed within 12" of the point shown on the map. they can be
in different locations.
1st London Rifle Brigade (LRB) is deployed anywhere touching the
Lyminge-Cheriton railway.
1st Queens Westminster Rifles Mobile Column, is a reinforcement arriving
turn 4 on the north edge within 6" of point B' in the small game.
1st Queens Westminster Rifles (-), is a reinforcement arriving turn 6 on
the north edge within 6" of point B' in the small game.
2/5th Queens (+) is a reinforcement arriving turn 7 on the north edge
within 6" of point B' in the small game.
C4 & C5 Mobile Battery is a reinforcement arriving turn 7 on the north
edge within 6" of point B' in the small game.
Brigade AT Battery is deployed within 12" of the point shown on the map
but must be touching the road
The 3 Sections 501st Field Company RE are each deployed touching one of
the bridges over the Royal Military Canal touching on the north side. One
section per bridge - see special rules. Note these units do not have standard
unit bases and are represented by a pillbox model which in effect acts as the
unit base.
B Coy Kent Home Guard is deployed in Sellindge which is a fortified nodal
point (3L) - see special rules
5th Stevedore Battalion (-) is deployed in or touching Hythe or Saltwood
Detachment 5th Stevedore Battalion (-) is in Dymchurch Redoubt (4L) - see
special rules
Small Arms School is placed between Dymchurch Redoubt and
Hythe but not touching either. it must be at least partially south of the road.
37th Super Heavy Battery RA must be straddling the railway between
Lyminge and Elham. It is in support of beaches (see special rules).
The units at RAF Lympne is placed in or touching
the BUA representing the buildings. It is in pillboxes (2L)
Bde HQ 2nd New Zealand Expeditionary Force and
Logistics enters the battle turn 8 within 12" of point A
C Squadron 2nd Divisional Cavalry enters the battle turn 5 within 6" of
point A'
Milforce enters the battle turn 6 within 6" of point A'
22nd Wellington Battalion enters the battle turn 7 within 6" of point A'
23rd Otago Battalion enters the battle turn 8 within 6" of point A'
German Deployment
Germans deploy second and move first
Large Game Only
Voraus Abteilung 21 Infanterie Regiment is deployed
between Dymchurch Redoubt and Hythe. Its front edge is touching the beach.
All other elements of 21 Infanterie Regiment arrive between Dymchurch Redoubt and Hythe,
see table below for arrival times and locations
Voraus Abteilung 55 Infanterie Regiment and Panzer Abteilung B are
deployed between Dymchurch Redoubt and Dymchurch. Their front edges are touching
the beach.
All other elements of 21 Infanterie Regiment arrive between Dymchurch
Redoubt and Dymchurch see table below for arrival times and locations
543 & 616 Panzerjäger arrives turn 6 within 6" of Dymchurch
Kampfgruppe Steinzler lands turn 2. The selected DZ must
be within 6" of the wood at point G
Kampfgruppe Meindl lands turn 2. The selected DZ must be within 6" of the
point H where the ridgeline meet
Kampfgruppe Brauer lands turn 6.The selected DZ must be within 6" of the
wood at point I
Small Game Only
Voraus Abteilung 21 Infanterie Regiment is deployed
between Dymchurch Redoubt and Hythe. Its front edge is touching the beach.
All other elements of 21 Infanterie Regiment arrive between Dymchurch Redoubt and Hythe,
see table below for arrival times and locations
All elements of 55 Infanterie Regiment arrive up to 6"
north of point J'. See table below for arrival times
543 & 616 Panzerjäger arrives turn 8 up to 6" north of
point J'
Kampfgruppe Steinzler lands turn 2. The selected DZ must
be within 6" of the wood at point G
Kampfgruppe Brauer lands turn 6.The selected DZ must be within 6" of the
wood at point I
Large Game Reinforcement Schedule
|
Turn |
Unit |
Entry |
|
2 |
Kampfgruppe Steinzler |
6 of G |
|
2 |
Kampfgruppe Meindl |
6 of H |
|
3 |
2 Kompanie Lehr Regiment Brandenburg |
Dymchurch Redoubt to Hythe |
|
3 |
1 Kompanie Lehr Regiment Brandenburg |
Dymchurch Redoubt to Dymchurch |
|
4 |
Stab 21 Infanterie Regiment; II Gruppe 21 Infanterie Regiment; 3 Kompanie 21 Pioneer Bataillon |
Dymchurch Redoubt to Hythe |
|
4 |
Stab 55 Infanterie Regiment, II Gruppe 21 Infanterie Regiment |
Dymchurch Redoubt to Dymchurch |
|
4 |
1 QMR Mobile Column |
12 of B |
|
5 |
1st Queens Westminster Rifles |
12 of B |
|
5 |
C Squadron 2nd Divisional Cavalry |
12 of A |
|
5 |
17 Radfhar Bataillon and 1 Nebelwerfer Abteilung (-) |
Dymchurch Redoubt to Hythe |
|
5 |
21 Pioneer Bataillon (-) and I/67 Artillerie Abteilung (-) |
Dymchurch Redoubt to Dymchurch |
|
6 |
2/5th Queens, C4 & C5 Mobile Battery |
12 of B |
|
6 |
Milforce |
12 of A |
|
6 |
17 Pioneer Bataillon |
Dymchurch Redoubt to Hythe |
|
6 |
Kampfgruppe Brauer |
6 of I |
|
6 |
543 & 616 Panzerjäger |
6 of Dymchurch |
|
7 |
22nd Wellington |
12 of A |
|
8 |
23rd Otago Battalion, Bde HQ 2nd New Zealand Expeditionary Force and Logistics |
12 of A |
Small Game Reinforcement Schedule
|
Turn |
Unit |
Entry |
|
2 |
Kampfgruppe Steinzler |
6 of G |
|
2 |
Panzer Abteilung B |
6 north of J |
|
3 |
2 Kompanie Lehr Regiment Brandenburg |
Dymchurch Redoubt to Hythe |
|
4 |
Stab 21 Infanterie Regiment; II Gruppe 21 Infanterie Regiment; 3 Kompanie 21 Pioneer Bataillon |
Dymchurch Redoubt to Hythe |
|
4 |
1 Kompanie Lehr Regiment Brandenburg |
6 north of J |
|
4 |
1 QMR Mobile Column |
6 of B |
|
5 |
C Squadron 2nd Divisional Cavalry |
6 of A |
|
5 |
1st Queens Westminster Rifles |
6 of B |
|
5 |
17 Radfhar Bataillon and 1 Nebelwerfer Abteilung (-) |
Dymchurch Redoubt to Hythe |
|
5 |
21 Pioneer Bataillon (-) and I/67 Artillerie Abteilung (-) |
6 north of J |
|
6 |
17 Pioneer Bataillon |
Dymchurch Redoubt to Hythe |
|
6 |
Kampfgruppe Brauer |
6 of I |
|
6 |
Milforce |
6 of A |
|
7 |
2/5th Queens, C4 & C5 Mobile Battery |
6 of B |
|
7 |
22nd Wellington |
6 of A |
|
8 |
543 & 616 Panzerjäger |
6 north of J |
|
8 |
23rd Otago Battalion, Bde HQ 2nd New Zealand Expeditionary Force and Logistics |
6 of A |
Terrain
The table is 8ft x 5ft if playing the large game, 6ft x 4ft If playing the small game. Ground scale is 6"=1km. North is indicated by the compass rose
Red lines are roads and the black dashed lines are railways. They have no game effects
The blue line is a the Royal Military Canal, this is a wide river. The treble black lines indicate bridges.
The dashed brown line are level two ridgelines. Those with triangles along them are escarpments with the points of the triangles indicating the direction of the down slope.
The open ground is actually a series of enclosed fields, so all the terrain is cluttered
The pale blue area is the sea, which is for the most part impassable. An area one base width wide bordering the coast is considered shallows.
Romney Marsh is the green are with the blue vertical lines in it. It is fields but also rough terrain due to the number of drainage ditches in the area.
The pale brown areas are level 2 hills and the dark brown level 3 hills. However there is no vision from the level 3 hills down to level 0. Remember the game uses hills or ridgelines not both. I recommend ridgelines
The green areas are unmanaged woods
The light grey squares are suburban BUA, the dark grey areas are town centre BUA
The grey circles with "flanges" are defended localities. They are treated as villages and use a similar template. Represent them in a similar way as a village on the table top but surrounded by barbed wire and with a few pillboxes scattered around. See special rules.
|
Terrain |
Movement |
Cover |
ZOC |
Fire Power |
||||||
|
Leg/non-motorised |
Wheels/ motorised |
Tracked/ mechanised |
Inf & Cav |
Towed Guns |
Vehicle |
Inf & Cav |
Towed Guns & Vehicles |
IDF |
||
| BUA Defended Locality |
Difficult |
Difficult |
Difficult |
3L |
1L |
1L |
Cluttered |
- |
1R |
Zero |
|
BUA Suburban |
Difficult |
Difficult |
Difficult |
2L |
1L |
1L |
Cluttered |
- |
1R |
Zero |
|
BUA Town Centre |
Difficult |
Difficult |
Difficult |
2L |
- |
- |
Cluttered |
- |
1R |
Zero |
| Dymchurch redoubt | 4L | - | - | Cluttered | - | - | - | |||
|
Fields Hedges |
- |
Difficult |
- |
1L |
1L |
1L |
Clear |
- |
- |
- |
|
Fortifications: Pillboxes |
* |
* |
* |
2L |
2L |
- |
* |
* |
* |
* |
|
Fortifications: Trenches |
* |
* |
* |
2L |
2L |
- |
* |
* |
* |
* |
|
Hill (optional) |
* |
* |
* |
- |
- |
- |
Clear |
* |
* |
* |
|
Romney marsh |
Difficult |
Difficult |
Difficult |
1L |
1L |
1L |
Clear |
- |
- |
- |
|
Sea, shallows |
Difficult |
Difficult |
Difficult |
- |
- |
- |
Clear |
- |
- |
- |
|
Woods Unmanaged |
Pure |
Impassable |
Impassable |
1L |
- |
- |
Cluttered |
- |
- |
Zero |
|
Terrain |
Movement |
Cover |
ZOC |
Firepower |
||
|
Leg/non-motorised |
Wheels/ motorised |
Tracked/ mechanised |
||||
|
Bridge & Defile |
Obstacle |
Obstacle |
Obstacle |
- |
- |
1R |
|
Ridgelines & escarpments |
- |
- |
- |
- |
Cluttered |
- |
|
River, Wide |
Pure |
Impassable |
Impassable |
- |
- |
- |
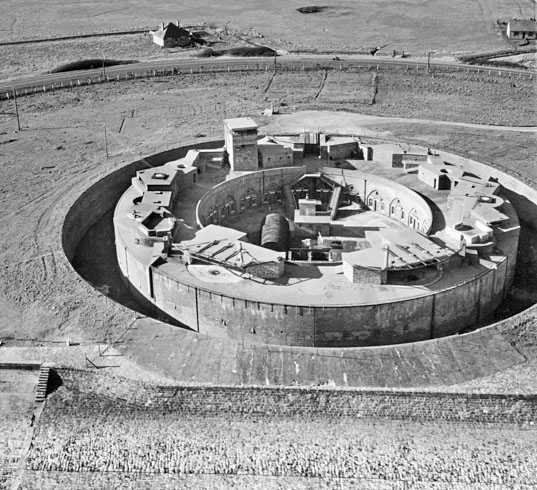
Dymchurch Redoubt 1948 - from http://www.britainfromabove.org.uk/image/eaw013670
Aircraft
The Luftwaffe is using most of its strength to keep Royal Navy at bay or to escort the Ju-52s carry the Fallschirmjäger, thus there is little close air support available. Stukas are active in turn 1 but will be busy attacking coastal guns which s not depicted by this scenario. In scenario terms only the Allies get air power. This is only available outside the times when the Luftwaffe are active.
The allied player may roll for aircraft on turns 3-4 and 7+. Roll 1d6, on a 4 they get 1d3 light attack aircraft (Lysander, Miles Magister or Tiger Moth), on a 5-6 they get two Blenheim or Hampden bombers
The Bombers may only attack German units touching the beach
Special Rules
The game is 10 turns long for the small version and 11 turns long for the large version
Dymchurch Redoubt is a 19th Century fort with a dry moat around it. It cannot be involved in a close combat unless a German Engineer unit is in contact. The unit within has no flanks. It is a very solid construction and gives 4 left shifts for cover
Defended localities are fortified villages. They are for the most part they are treated as a suburban BUA. Due to the obstacles around the village any unit attempting to come into contact must halt 1" away and may not contact. If a unit is already 1" away it may move to contact but it is subject to a minefield attack of 9 factors before it contacts. Engineer units are only subject to an attack of 4 factors.
Any German unit attempting to cross the military canal by a bridge must contact a pillbox held by the 501st RE. The German unit will count as attacking from a defile. Any unit moving to close assault the pillbox and still touching the canal (so not just attacking across the bridge) is subject to a minefield attack of 9 factors before it contacts. Engineer units are only subject to an attack of 4 factors.
The bridges are wired for demolition however at least one bridge will fail completely to blow and remain intact (Historically in exercises simulated bridge demolitions were poorly conducted, and demolishing all the bridges would break the scenario)
Folkestone, Cheriton and Sandgate are out of play to both sides:
Any German unit within 6" will be attacked by 2FP if it is also subject to another Allied attack (artillery must be called down successfully if its the only other attack) the bonus applies to all shooting at targets within 6" of the towns.
British units subject to involuntary moves (ie forced back) may enter the towns. Once in the town they must roll each turn to activate and leave the town. Any Allied unit at least partially within the towns may not shoot.
Also take note of the following chrome rules (further explained in the BBWWB rulebook)
German units touching the coast must remain disrupted
Paratroopers that have just landed are both disrupted ad regrouping. This is in effect a double disruption.
Units with the flame attribute reduce all cover to 1L if in contact with the enemy
501st Engineers demolishing bridges
Victory Conditions
The victory locations are: bridges over the royal military canal; escarpment EF (EF' in the small game); escarpment CD (C'H in the small game), road exit A (A'); road exit B (B') and the RAF bases
To win the Germans must clear an intact bridge over the Royal Military canal, clear escarpment EF (EF' in the small game) hold an RAF base, and contend any of escarpment CD (C'H in the small game), road exit A (A') or road exit B (B')
The game is a draw if the Germans only clear an intact bridge over the Royal Military canal, clear escarpment EF (EF' in the small game) and hold an RAF base.
Any other result is an allied victory
To clear an objective there must not be an Allied unit touching it at the end of the game.
To hold an objective there must not be an Allied unit touching it at the end of the game and a non spent German unit must be touching it.
An objective is contended if both a German and Allied unit is touching it at the end of the game.
References
The scenario is generated from the German and British plans taken from:
Invasion of England 1940 by Peter Schennk - German invasion plans
We Shall Fight Them by Ian Lofting - British preparations
Pillboxes of Britain and Ireland by Mike Osborne provided some useful info about pillboxes, especially the nugget that most UK pillboxes of the time were only bullet proof not shell proof
The map came from: http://www.npemap.org.uk/tiles/map.html#616,135,1