
Battle in the Bogs - Meijel
28/10/44
|
Endorsing the Army Group B commander's plan, Rundstedt ordered that the XLVII Panzer Corps attack on 27 October with the 9th Panzer Division and attachments from the 15th Panzer Grenadier Division, whereupon the rest of the panzer grenadiers were to exploit early gains of the armour. The attack was to strike sparsely manned positions of the 7th U.S. Armored Division along the Deurne Canal and the Noorder Canal deep within the Peel Marshes west of Venlo. The centre of the thrust was to be the town of Meijel, near the junction of the two canals. Only a limited objective was assigned: to carve a quadrilateral bulge into Allied lines six miles deep, encompassing about forty-five square miles. The deepest point of penetration was to be at Asten, northwest of Meijel alongside the Bois le Duc Canal At 0615 on 27 October, after a week of bad weather that had reduced visibility almost to zero, the dormant sector within the Peel Marshes erupted in a forty-minute artillery preparation. The attack that followed came as a "complete surprise." From: http://www.7tharmddiv.org/docrep/CMH-Siegrfried-Ch-10.doc |
The scenario depicts the second day of the attack. the Germans having captured Meijel are pushing up the roads to Asten and Leisel. The US defences started to firm up on the 28th and 7th AD launched a series of counter attacks
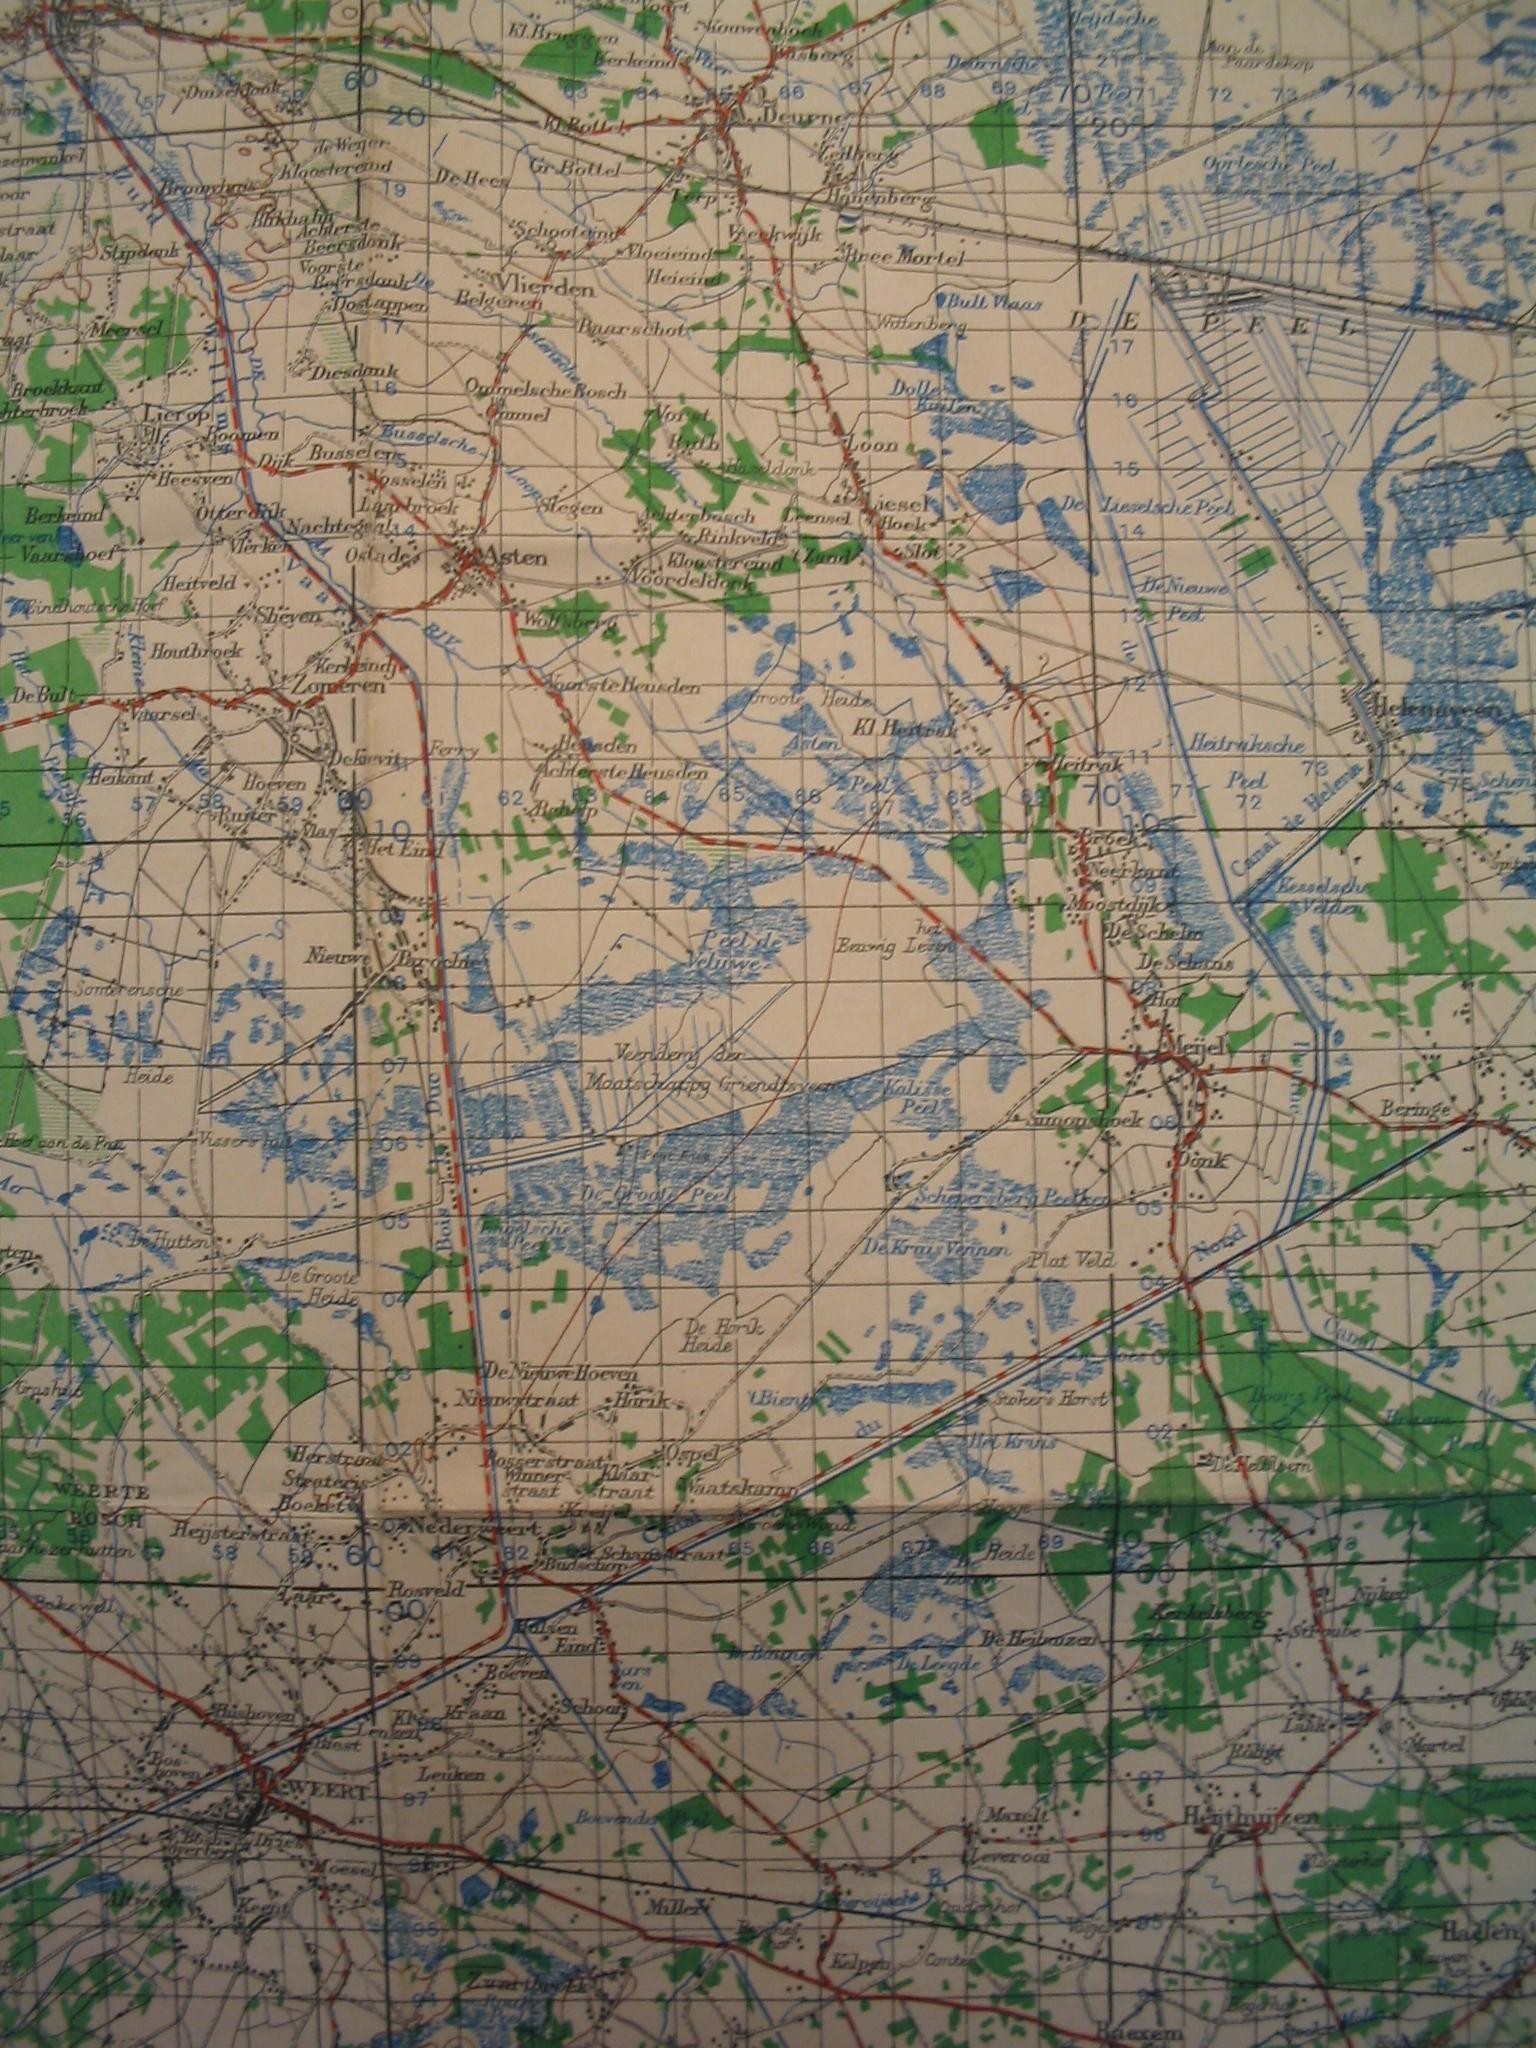
Wartime US map of the area. The original and larger map can be found: http://www.7tharmddiv.org/docrep/map-holland-meijel%20grid.jpg
Map and Order of Battle
US Deployment
Most US units start on board and are deployed in the areas delineated by the pink dashed lines
Combat Command B (A & C Coy 23rd AIB and A Coy 31st TB) is a reinforcement entering the board on turn 7. The infantry may enter up to 12" either side of road B. All vehicles must enter along road B in a column. Each vehicle after the first loses 3" from its move for each vehicle that proceeded it.
German Deployment
Most German units start on board and are deployed in the areas delineated by the pink dashed lines
9 PzAA enters the board on turn 1. The infantry may enter between points D & F. All vehicles must enter along road E in a column. Each vehicle after the first loses 3" from its move for each vehicle that proceeded it.
Terrain
The map is an 6.5ft x 5ft area if playing 1"=50m
The open ground is boggy fields. Personal stands are unimpeded. Tracked vehicles proceed at half speed. Wheeled vehicles and manhandled guns are at quarter speed
The green dotted lines are tree lines and hedges. These break LOS and give -1 cover to all stands. Any stand on a road with an adjacent hedge is assumed to be adjacent to the hedge
The thick blue line is a big drainage ditch. Personnel and tracked vehicles take a BMA to cross. Manhandled guns and wheeled vehicles cost a 2xBMA. personal stands (but not towed guns) in the ditch get -2 cover from shooting from outside.
Red lines are tarmac roads. The Pink lines are minor roads. Stands on minor roads do not get the road bonus but do ignore movement penalties for the surrounding terrain
The green areas are dense forest. Impenetrable to vehicles and manhandled guns, half speed for personnel. Where roads penetrate the woods max visibility along the road is 6". Units on the road still count as being in cover.
The turquoise areas are boggy. Half speed for personnel and impenetrable for all vehicles and man-handled guns.
The large grey squares are 4x4 stone BUA's, The small grey squares are small BUA's that can hold a single personnel stand. The simple town fighting rules are in effect.
Air Support
In this battle the US forces were supported by the RAF. From turn 3 onwards roll every turn for air support. On a 6 (d6) the Allies get a Typhoon or Tempest armed with rockets
On turn 3 and each turn thereafter roll d6. On a 4-6 the US get an L4 Grasshopper AOP. This can call fire from any US artillery battalion (all three guns) 1-5. It can call a British battery on 1-5 and the entire regiment 1-3
Special Rules
The game is 12 turns long
The weather starts misty, on turn 1 LOS is limited to 6". Turn 2 onwards LOS is 60"
US forces may not move turn 1
The church in Neerkant is a dominant feature.
One personnel stand in the BUA containing the steeple gets improved LOS for spotting purposes only. It does not improve their shooting range but does improve the range they can call IDF. The tower can see over all terrain that breaks LOS. There is a "blind spot" of 3 inches behind any terrain that breaks LOS.
The steeple may be targeted by enemy guns. To destroy the tower roll for an HE hit at -5. Destroying the tower does not effect the stand within but does remove the improved LOS bonus
D Coy 17th TB is defending the positions of the 440th Artillery immediately off table.
D Coy may not move from its deployment area while the 440th is in position.
The US forces may chose to move the 440th backwards in any move phase turn 2 onwards. The guns will be silent the turn of moving and the next.
If the guns have not moved, or moved the previous turn, and the Germans get a stand on the table edge between G & H - they get a 6" bonus (see VP's) the guns MUST move next turn if they have not already done so
If the guns have moved, and its turn 6 of later, and no German stands are in LOS of D Coy, D Coy will be redeployed north - ie removed from the table
Victory Conditions
Roads BD & GE are the victory locations. Both sides will be rewarded for how far they advance down the road.
After set up, before the game starts, place a counter on each of the roads.
On road BD this is placed equidistant between the northernmost German stand touching the road and the southernmost US stand (or point B if there are no US stands touching the road)
On road CE the counter is placed equidistant between point E and the easternmost US stand touching the road
At the end of the game another counter is placed on each road.
On road BD this is placed equidistant between the northernmost German stand in good morale touching the road (or point D if there are no German stands touching the road) and the southernmost US stand in good morale (or point B if there are no US stands touching the road)
On road CE the counter is placed equidistant between the westernmost German stand in good morale touching the road (or point E if there are no German stands touching the road) and the easternmost US stand in good morale (or point G if there are no US stands touching the road)
On each road measure the distance between the original counter and the end game counter. The starting score is 0. Add the distance between the counters if the Germans have advanced subtract the score if the US has advanced. If the score is positive the Germans have won if its negative the US forces have won
For example image the counter has moved 43" south down road BD (i.e. an American advance) and 37" west along road GE (ie a German advance). The final score would be 0-43+37 for a net score of -6. As its negative it's a US victory
Finally the Germans can get a +6" bonus for reaching GH before the 440th Artillery has retreated (see above)
Good morale means not shaken and not demoralised
References
Most of the References for this, including many details on the German forces and the map were taken from the 7th Armored Division's excellent document repository: http://www.7tharmddiv.org/docrep/
German Details: http://forum.axishistory.com/viewtopic.php?f=54&t=20672&start=15
25th Artillery Regiment: http://www.royalartilleryunitsnetherlands1944-1945.com/pageID_6357686.html#
Fire Brigades, Kamen Nevenkin
Panzer Strengths Vol 1 Pt 2, J Dugdale