Nomonhan (Khalkhin-Gol)
2/7/39 & 3/7/39
In 1931 the Japanese invaded Manchuria and took it from the Chinese. This put Japanese forces on the border of Soviet dominated Mongolia. The Japanese and Soviet claims for the location of the Mongolian-Manchurian border were in conflict: the Japanese claiming it was on the Khalkin-Gol river the Soviets claiming it was 15km to the east near the small town of Nomanhan. The scene was set for an inevitable confrontation between the two powers
In early 1939 there was in incursion of several hundred Mongol cavalry into the Japanese claimed area. The Japanese decided to respond with massive force, to bring the Soviets into battle, and destroy the threat to the border once and for all. The Japanese sent the heavily reinforced 23rd Infantry Division to the area.
The first Japanese forces to arrive in was the 23rd Recce Regiment which found the Mongol incursion and drove them across the border. The Soviets interpreted this move as an invasion and moved reinforcements to the area, including the 11th Tank Brigade. There was a further, more bloody, clash on the 28/5/39 which ended in a stalemate, however the Soviets remained with a significant bridgehead over the Khakhin-Gol river.
The Japanese finally launched their main offensive late on the 2/7/39. The plan was for the Yasuoka Detachment, containing all the Japanese armour in Manchuria, to attack the Soviet bridgehead over the Khakhin-Gol river whilst the main force of the 23rd Infantry Division crossed the river further north, cut behind the bridgehead and prevented the Soviet's retreat. The attack was supposed to happen on the 3rd.
The Japanese made many errors. They chronically under-estimated Soviet numbers and fighting prowess. This lead to fatal over-confidence. On the 2nd when erroneous reports were received by the Yasuoka Detachment that the Soviets were retreating back across the river Yasuoka decided to launch a pursuit attack, thinking to prevent the Soviets getting away. The Russians and Mongolians were still firmly entrenched so the I'll prepared assault ran in to the teeth of prepared defences. It also left the 23rd division's assault to start on the 3rd unsupported.
The 23rd Infantry's river crossing was made by the division's engineers on the night of the 2nd. The entire division was supposed to be over by dawn on the third. but the weakness of the bridging equipment and very poor traffic control meant that only half the division was across when it started to get light. None the less the 71st and 72nd infantry regiments advanced rapidly, easily pushing back the Mongolian outposts. It was not to last. Gregory Zhukov had newly arrived in theatre to take command of the Soviet forces. His first act was to mobilise his armour and air forces and to launch a massive concentric counter attack on the Japanese infantry on the west bank. Over 100 AFV's verses infantry with a few towed guns, pole mines and petrol bombs. The Japanese advance was about to get a whole lot harder.
This scenario is actually two: the attack of the Yasuoka Detachment late on the 2nd and the encounter battle between the 23rd Infantry and the 11th Tank Brigade. Each scenario could be played separately.
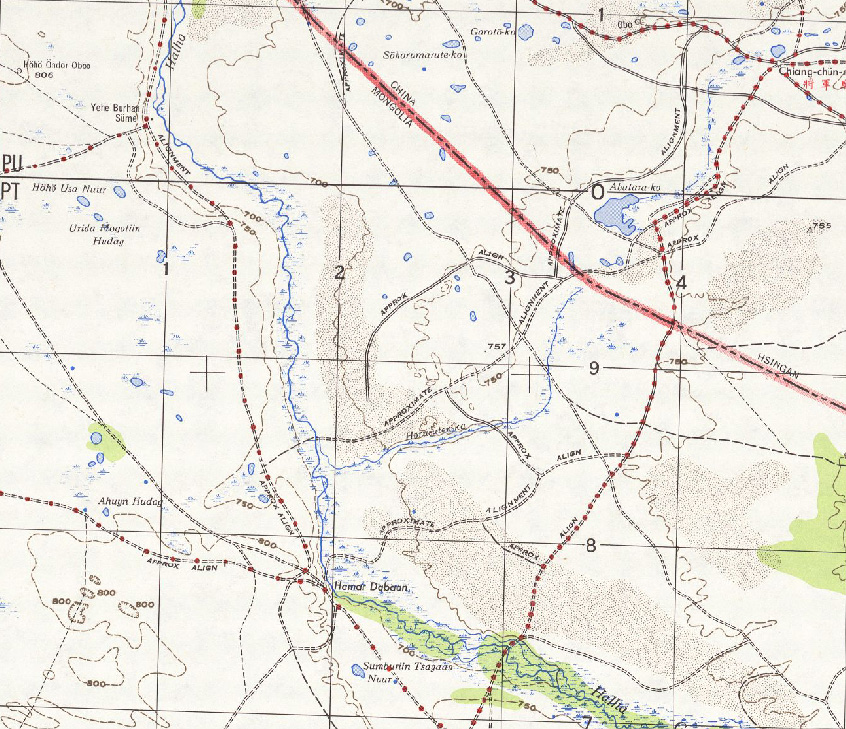
US Map of the Battlefield, 1 square is 5 miles
Yasuoka Attacks
2/7/39
(to be written)
Encounter on the Plain
3/7/39
v1.1.1
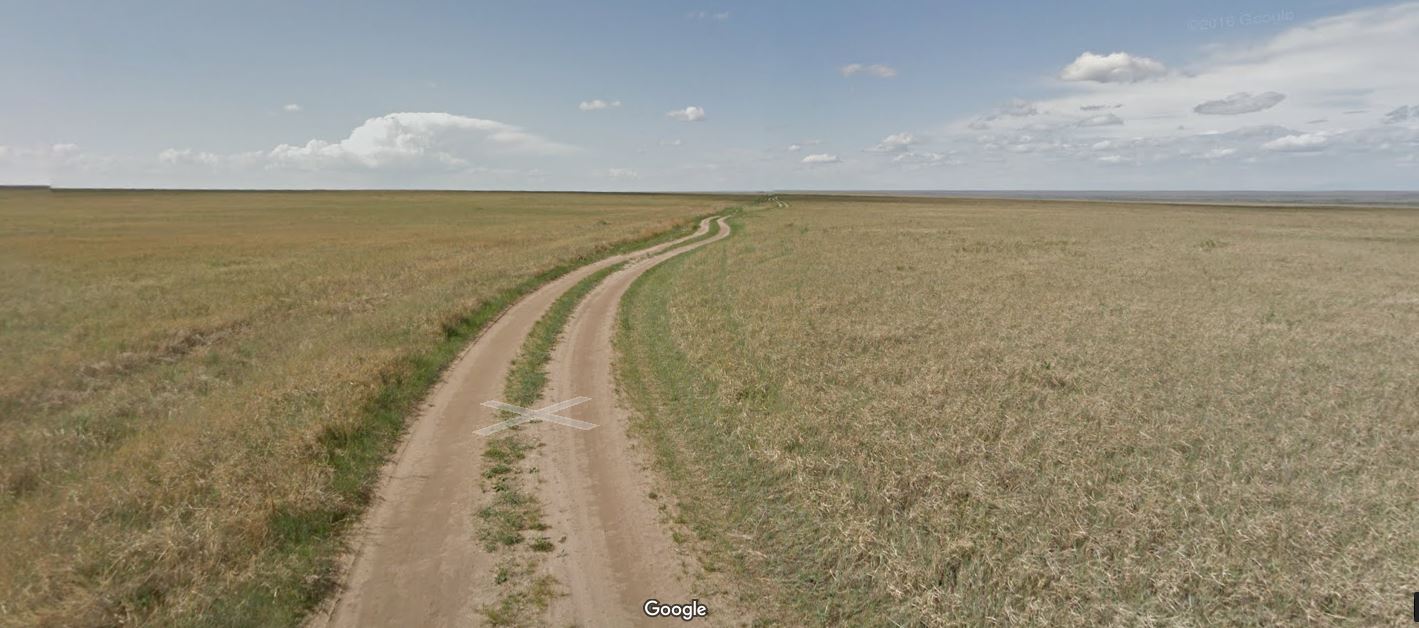
Modern day Google "Street" View of the battlefield looking Northwards towards the Japanese crossing point. It was taken at roughly point S on the map, Its dated July 2015 so the same season as the battle.
Map and Order of Battle
Japanese Deployment
Japanese deploy first
The battalions of the 71st Infantry Regiment are deployed in the area delineated by the pink dashed lines, 36" table-top inches on a side.
The 1st Battalion 72nd Infantry Regiment is deployed within 18" of point X
The Bridge Covering Group must be deployed touching the pontoon bridge. It may not be moved unless there has been a Soviet unit within 12" in any previous turn.
Japanese off table artillery and the associated logistics are available turn 1
All other battalions enter at point X. The 2nd Battalion 72nd Infantry Regiment enters turn 2. The 3rd Battalion 72nd Infantry Regiment enters turn 3. The 1st Battalion 26th Infantry Regiment enters turn 4. The 2nd and 3rd Battalion 26th Infantry Regiment enter turn 5.
Soviet Deployment
Soviets deploy second
The 2nd Battalion 11th Tank Brigade and Recce Coy 8th Mech Brigade deploy in the deployment areas shown on the map. The Recce coy cannot deploy within 12" of a Japanese unit. The tank battalion can not deploy within 18" of a Japanese unit.
The 3/185th and 2/175th Artillery Battalions are deployed in the area shown on the map. They must be deployed facing east. The come under the player's control on turns 3 and 5 respectively, or if an Japanese unit ends its turn within 12" of the unit.
The majority of the 11th Tank Brigade enters the battle on turn 2. It enters within 12" of point V
The Elements of the 6th Mongolian Cavalry Division enter the battle on turn 3, anywhere up to 12" south of point V
The 24th Rifle Regiment enters along the west side of the map up to 18" from point W on turn 5
The 247th Armoured Car Battalion enters the battle on Turn 6 within 6" of point U
Terrain
The table is 6ft x 4ft if playing 6" = 1km. North is towards the top of the page
For the most part the terrain is flat open grassland, It gently rises from the south to the north. The river is in a fairly steep sided valley, but this has no tactical significance
The blue line is an Halha River which is impassable.
The triple black line is a rickety pontoon bridge erected by the Japanese.
The red dashed line is a "road", in reality just a pair of wheel tracks in the dirt. it has no game effect.
The blue splodges are ponds or small lakes. They are impassable but otherwise have no game effect
The turquoise areas are marshy
|
Terrain |
Movement |
Cover |
ZOC |
Fire Power |
||||||
|
Leg/non-motorised |
Wheels/ motorised |
Tracked/ mechanised |
Inf & Cav |
Towed Guns |
Vehicle |
Inf & Cav |
Towed Guns & Vehicles |
IDF |
||
|
Lake |
Impassable |
Impassable |
Impassable |
- |
- |
- |
Clear |
- |
- |
- |
|
Marsh |
Pure |
Impassable |
Difficult |
- |
- |
- |
Clear |
- |
- |
- |
|
Open |
- |
- |
- |
- |
- |
- |
Clear |
- |
- |
- |
|
Terrain |
Movement |
Cover |
ZOC |
Firepower |
||
|
Leg/non-motorised |
Wheels/ motorised |
Tracked/ mechanised |
||||
|
Bridge & Defile |
Difficult |
Difficult |
Difficult |
- |
- |
1R |
Special Rules
The game is 9 turns long. The day starts overcast but become bright and sunny later.
Japanese move first
The Japanese GS artillery is 12" from point X. All off table artillery ranges are measured from point X. The Japanese logistics cannot pass the congestion at the pontoon bridge so can only re-supply the artillery
Victory Conditions
The game is best played twice with the players swapping sides after the first game. The player to get an in-supply Japanese infantry unit furthest south (measured from point T) wins.
If only one game is to be played to following conditions can be applied:
If the Japanese have a unit within 6" of the road exit at point Y at the end of the game they win a stunning victory
If the Soviets have a unit within 6" of Japanese pontoon bridge at the end of the game they win a stunning victory
If both sides qualify for a stunning victory the game is a draw.
If neither side makes a stunning victory then the Japanese win if they have an in supply infantry unit south of line VSR (which is halfway down the table). Otherwise they lose
OB Notes
Both sides command and control was poor, hence the lack of HQ's.
Japanese logistics were hampered due to the overcrowded, rickety, bridge. Thus they have no logistics units for their infantry.
Japanese "bazookas" are actually flame bottles "Molotov Cocktails" which were particularly effective against the over-heated BT tanks.
References
Nomonhan - Japan Against Russia, 1939, Alvin D. Coox
Nomonhan - Japanese-Soviet Tactical Combat, 1939, Levenworth Papers No.2 Edward J. Drea
Rikugun - Guide to Japanese Forces 1937-1945, Vol 1, Leland Ness
RKKA in WW2: http://www.armchairgeneral.com/rkkaww2/index.htm . Maps are here: http://www.armchairgeneral.com/rkkaww2/maps/maps1938_40.htm , OB information here: http://www.armchairgeneral.com/rkkaww2/battles/khalkhin_gol39.htm