Prokhorovka
12/7/43
This scenario depicts the part huge tank battle in front of Prokhorovka Station between 1 SS Panzer Grenadier Division Leibstandarte Adolf Hitler and the majority of the 5th Guards Tank Army. There is a good account of the battle here: http://www.angelfire.com/wi2/foto/ww2/proh/ though newer studies contend some of the facts. This scenario relied heavily on Valeriy Zamulin's new book Demolishing the Myth and depicts the fighting for Oktiabriskii State farm early in the offensive

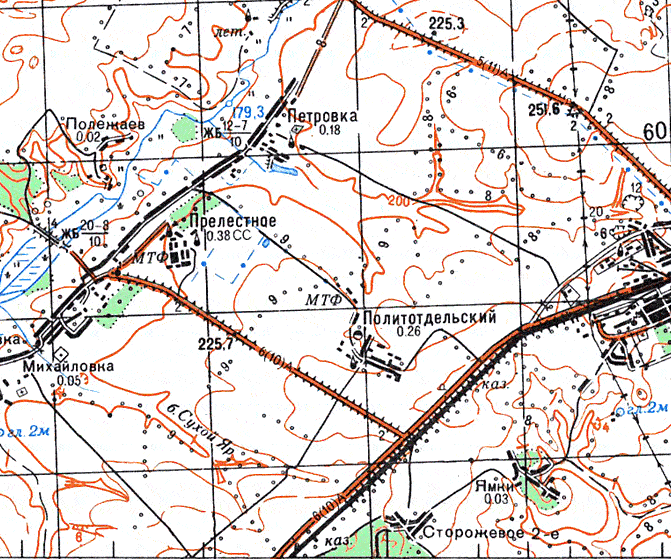
Modern Map of the Battle area - from sheet M37-026 (see: http://nav.lom.name/maps_scan/M37/100k/ )
Map and Order of Battle
German Deployment
All German forces start deployed on the table. The Kampfgruppe 2SS Panzergrenadier Regiment is in the front line with the Panzer Regiment behind them
Kampfgruppe 2SS Panzergrenadiers deploy between the red dashed lines around the state farm, that's I & II SS PG Btl, SS StuG Abt, 2.SS Pioneer Btl and 5.SS FlaK Abt
Stab SS Panzergrenadiers must be in one of the BUAs of the state farm
The Panzer Regiment LSSAH is deployed at the south west end of the battlefield in the area delineated by the pink dashed line.
Soviet Deployment
All the Soviet forces start off the table. Unless otherwise indicated they enter turn 1.
For the most part units of the 18th Tank Corps enter between A & B and those of the 29th Tank Corps between points B & C
The 53rd Motor Rifle Brigade may enter from turn 4 between points C & D
The arrival of the 181st tank Brigade is random. The Soviet player should roll in the orders phase for arrival turn 6 onwards (i.e. the tanks will arrive on turn 7 at the earliest). The 181st arrives on a 4-6 (d6). It arrives anywhere between points I and H
No reinforcement can arrive within12" and LOS of an un-demoralised enemy stand. If entry is impossible, the reinforcements can enter a turn later up to 12" from their indicated entry location. If entry is still impossible move 12" further away every turn until entry is possible.
Terrain
The map depicts a 5ft x 10ft table if playing at a scale of 1"=50m.
The yellow area, pink dashed lines and grey dashed line are NOT terrain, but markers (see below)
The open terrain is a combination of wheat fields and grasslands. There are no hedges at the field boundaries
The red lines are roads. Where the roads are tree lined a stand on the road is always considered touching the tree line.
The brown and sand dashed lines represent crest lines on hills. The dark brown lines are higher than the sandy lines. All AFVs touching the dark brown lines get hull-down against fire that crosses the ridgeline. All AFVs touching the sandy lines get hull-down against fire that crosses the ridgeline UNLESS the firer is touching a dark brown line. Stands touching one dark brown line will always have LOS to stands touching another dark brown line. Stands touching dark brown crest lines can see over all intervening terrain with a few exceptions: trees or BUAs within 6" of the dark brown line break LOS; trees and buildings further away have a 3" "dead zone" behind them in to which no LOS can be traced. No ridge can see in to the ravines. No ridge counts as cover for spotting purposes. The dark brown ridges count as cover for morale purposes as long as all enemy in LOS are the other side of the ridge. Sandy ridgelines do NOT count cover for morale purposes
The thin sandy areas are deep ravines filled with scrub. The ravines take 1 BMA to enter and 1 BMA to exit for all stands. When in the ravine a stand cannot be fired at (even from a dark brown ridge) except by another in the same ravine that can trace a LOS that never goes out of the ravine or a stand touching the ravine that can trace a LOS that never goes out of the ravine. Movement along the ravine is half speed for tracked vehicles and infantry, 1/4 speed for wheels and manhandled guns. Stands in the ravine get +1 cover. Max visibility along the ravines is 6". Stands in the ravine can not shoot out except against stands touching the ravine edge. Stands in the ravine do not block line of fire for stands outside the ravine.
Grey squares are BUA's representing fairly widely spaced wooden buildings. Infantry and towed guns within get -3 cover (see below), vehicles get -1 cover. There are no ROF restrictions
Green dotted lines are tree-lines. they break LOS, unless the stand is touching, and give light (-1) cover.
The triple brown line is a deep AT ditch. This can be treated as a ravine except no vehicle or man-handled gun can cross it. However the German engineers have blasted a crossing. This may be placed as the German player chooses. Tracked vehicles cross at the expense of a BMA, wheeled vehicles and manhandled guns cost 2xBMA.
The green area is an area of extensive fortifications left behind by the Russians and taken over by the Germans. Any personnel stand or unlimbered towed gun within that spends the turn halted is considered entrenched and get -3 cover. The road CF is NOT in the fortified zone.
Air Support
For the most part the Luftwaffe dominated the skies, but the VVS did make some efforts to contend air superiority and flew ground attack missions. Each side rolls 1d10 at the start of each turn for ground attack. If the enemy gets ground attack planes then their opponents can roll d10 for fighters. If BOTH sides get fighters match opposing pairs and remove them leaving only the surplus fighters from one side or another. Fighters in this scenario never strafe
German Ground Attack: 7: 1 Ju-87G, 8: 2 Ju-87D; 9: 2 Hs-129 (37mm), 10: 2 Ju-87D & 1 Ju-87G
German Fighters: 6+: 2 Bf-109G
Soviet Ground Attack: 8: 1 Pe-2, 9 Il-2m (rockets) 10: 2 Il-2m (AT Bomblets)
Soviet Fighter: 8: 1 La-5FN, 9: 2 La-5FN, 10: 2 P39
If playing the simplified aircraft rules the Soviets place their aircraft first
German Aircraft Special Rules
Off table there is a German FLIVO (forward air controller) All attacks in the yellow zone benefit from his guidance and only deviate on a roll of a 10
Soviet Aircraft Special Rules
There were numerous examples of fratricide in the battle: Soviet aircraft control was lamentable. To reflect this, if using the simplified aircraft rules, Soviet aircraft deviate on a 7-10 and can be moved 36" by their opponent if they do so.
Any turn the Soviets successfully roll for ground attack the chances of the Germans successfully calling for all the off table artillery drops to 1-4. This needs to be rolled even if the target is in the "yellow zone". It is assumed some of the Soviet aircraft are bombing the artillery positions.
German Artillery Special Rules
The south west end of of the battlefield is overlooked by a hill occupied by the German artillery. All off table artillery can self observe into the yellow zone and will not need calling if the target is in the open and its not in the 3" dead zone behind a tree line. Measure LOS from the centre of the SW table edge. Note Soviet bombing may stop the self observation
For the first three turns of the game all German off table artillery arrives on a 1-7 (it climbs to 1-8 due to the huge enemy target density later in the game)
Soviet Artillery Special Rules
Soviet artillery was not well organised during the battle, hence the lack of heavy guns and katyushas.
Brigade level artillery (ie that with command/FO stands) may only fire if the command/FO stand is within 2" of the Brigade commander, the artillery is attached to. When this happens then the subordinate BHQs of the brigade can also call artillery. This ability ceases if the distance between the Brig HQ and the cmd/FO increases beyond 2"
Other Special Rules
The game lasts 10-11 turns. At the end of turn ten roll a d10, on a 6+ there will be an 11th turn
The Panzer Regiment LSSAH is in reserve. It can not move until a Soviet stand has passed south west of the grey dashed line XY
When 181st TB arrives on table roll d10 for every stand. On a 1-3 the stand is removed from the unit before entering
The 136th Gds RR and 23rd Gds AR are not part of the game but are holding the front line. No German stands can be moved into their deployment zones
Victory Conditions
To win the Soviets must get as many tanks and infantry pairs as they can within the yellow zone at the end of the last turn of the game
Each tank in the zone scores a point. The infantry it is paired with scores no points, but the infantry must be in the yellow zone to allow the tank to score. Pairs need not be adjacent. Pairs are exclusive: each infantry stand may only pair with one tank and each tank with one infantry.
The Soviets get a bonus point for each THREE infantry stands in the green zone at the end of the game, but ONLY get these points if at least one tank infantry pair reaches the yellow zone
The Germans automatically lose if they don't maintain a 3:1 tank kill ratio in their favour
For the purposes of victory conditions a "tank" is any tank or SPG. It doesn't include armoured cars or SP Flak. Infantry is any infantry, command infantry, MMG or weapons stand.
To count for victory point purposes a stand must not be shaken or demoralised
If the Soviets manage 3 points or less they lose. 4-5 Points is a draw. 6+ points is a Soviet win
References
Battle for Kursk - Soviet General Staff Study: David M. Glantz & Harrold Orenstein
Battle of Kursk: David M. Glantz & Jonathan M. House. http://www.angelfire.com/wi2/foto/ww2/proh/index.html
Demolishing the Myth: Valeriy Zamulin (also the Russian version which has more detailed strength tables)
Fire Brigades: Kamen Nevenkin
German WW2 Organisational Series Vol 5/III: Leo Niehorster
Kursk 1943: Nicklas Zetterling & Anders Frankson