Encounter at Rossienie
24th June 1941
v2.0.1
On the first day of Operation Barbarossa 6 Panzer Division advanced about 60km and took the town of Rossienie (German spelling Rasianiai is the Lithuanian spelling). The division pushed out spearheads to the Dubysa river beyond the town and had established small bridgeheads by the evening.
At first light on the 24th the Soviets counter-attacked. The tanks of the 2nd Tank Division, 3rd Mechanised Corps smashed into the southern bridgehead held by the 6 Kradschützen Bataillon. The Germans had no intelligence on the Soviet KV tanks and their appearance came as a great shock. The invulnerable monsters ignored the puny 37mm guns of the motorcyclists and the KV's blasted their way through the bridgehead, scattering the Kradschützen.
There was no pause at the Dvina river, the Soviet tanks pushing up the steep slope beyond on to the plateau defended by the 114 Schützen Regiment. By this time the Germans were marshalling their reserves and the scene was set for a tank battle between the old Czech tanks of 6 Panzer and the new dreadnoughts of the 2nd Tank Division
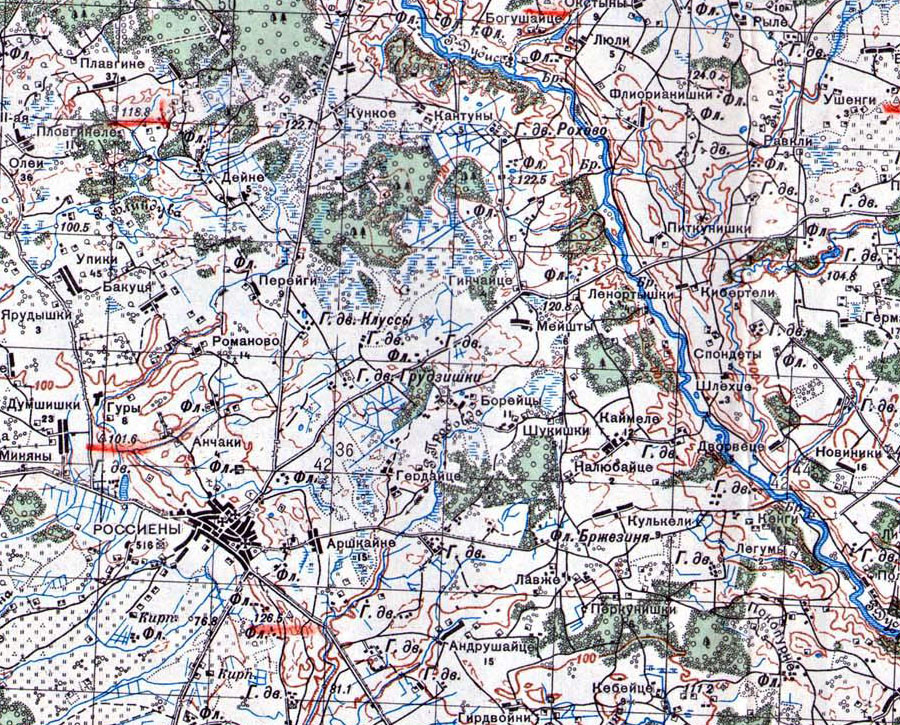
1940's map of the battlefield from: http://www.wwii-photos-maps.com/
German Deployment
German units are deployed in the deployment areas delineated by the pink hashed lines. No German units are dug in.
The 6 Kradschützen arrives from the east possibly on turn 1 (see special rules below). It enters along board edge AC
The Division Stab is deployed within 6" of a BUA in Rossienie
11 Panzer Regiment Stab & Stabs Kompanie are deployed with 65 Panzer Abt
114 Schützen Regiment Stab, Stabs Kompanie, 2 Kompanie 57 Pioneer Btl & 2 Kompanie 41 Panzerjäger Abt are deployed in the deployment areas of either I Btl. The PaK and FlaK may be attached to line companies if the players so wish
Stab 76 Artillerie Regt can be with either I or III Abt
1 Batterie 52 Nebelwerfer Regt is a reinforcement. it arrives down road Z or between Q & P on turn 7. It can not H&I before its arrival on table
2 Batterie I Abt 3 Luftwaffe FlaK Regiment is a reinforcement. it arrives down road Z or between Q & P on turn 5
616 Panzerjäger Abt is a reinforcement entering down road Z. It enters the turn after the first Soviet tank reaches road XZ
Soviet Deployment
All Soviet forces arrive on the table edge between points A & C, with the exception of 2nd Artillery Regiment no artillery can H&I until its parent unit has entered the table
1st Tank Battalion and Staff 3rd Tank Regiment arrives on table turn 2.
RHQ, 2nd & 3rd Tank Battalions, 3rd tank Regiment arrive turn 3
4th tank battalion & 1st Motorised Rifle Battalion arrive turn 4
The rest of 2nd Motorised Rifle Regiment arrives turn 5
Divisional Staff arrive turn 6
The FO for 2nd Battalion, 2nd Artillery Regiment arrives randomly. Roll a d6 at the start of each turn starting turn 3. They arrive on a roll of a 6. From turn 3 all batteries may H&I fire
Reinforcement Arrival
No reinforcement can arrive within12" and LOS of an un-demoralised enemy stand. If entry is impossible, the reinforcements can enter a turn later up to 12" from their indicated entry location. If entry is still impossible move 12" further away every turn until entry is possible.
| Turn | Unit |
| 1 | Kradschützen in good morale |
| 2 | 1st Tank Battalion and Staff 3rd Tank Regiment. Pinned Kradschützen |
| 3 | 1st Shaken Kradschützen Kp. Start rolling for Soviet Arty FO's (arrive on 6), RHQ, 2nd & 3rd Tank Battalions, 3rd tank Regiment |
| 4 | 4th tank battalion & 1st Motorised Rifle Battalion |
| 5 | 2nd Shaken Kradschützen Kp & 2 Batterie I Abt 3 Luftwaffe FlaK Regiment, 2nd Motorised Rifle Regiment |
| 6 | 2nd Divisional Staff |
| 7 | 1 Batterie 52 Nebelwerfer Regt |
Terrain
The map is 6ft x 12ft if playing at 1" = 50m. North is indicated by the rose
The brown squares with thin borders are 4"x4" BUA's. These are wooden buildings which are widely spaced so give -2 cover to personnel only (not towed guns). Vehicles may enter these BUA's but do not get any cover
The squares with thick borders make up the town of Rasianiai. The brown squares are wooden buildings (-2 cover) and the grey squares are stone buildings (-3) cover. For Rasianiai the simple town fighting rules are in effect
The brown thin dotted lines are crest lines. Crest lines break LOS and give hull down positions to AFV's touching them (-2 cover).
The red lines are good roads
The blue lines are streams or drainage ditches they cost infantry and tracked (inc half tracked) vehicles a BMA to cross. They cost 2xBMA for wheeled vehicles and manhandled guns. Personnel within (not towed guns) -2 cover.
The light blue areas are marshy meadows. Any tracked (or half tracked) vehicle stand within is at half speed. Wheeled vehicles and man-handled guns within move at quarter speed. Personnel are unaffected.
The dark green areas are open woods. -1 cover. Any tracked (or half tracked) vehicle stand within is at half speed. Wheeled vehicles and man-handled guns within move at quarter speed. Personnel are unaffected.
The open areas are farm land. Cover is sparse but some field, stream and road boundaries have some scrub (-1 cover break LOS). Lengths of scrub should not be longer than 4" and be at least 12" apart.
Special Rules
The game starts at 11:00 and lasts 13 or 14 turns. Weather is bright and clear
At the end of turn 13 roll d10, on a 6-10 another turn is played otherwise the game stops
6 Kradschützen started the day off the east table edge on the east bank of the Dvina. They are retreating before the KV's of 1st Tank Battalion. Before the game each company (but not Stab) must take a morale check at -3 (ie pass on a 5). Units that pass their morale enter the table turn 1. Units that pin enter the table turn 2. The first shaken company (German players' choice) enters turn 3, the second turn 5. The third shaken company and any demoralised units are removed for the game. Stands can be placed on the table edge AC, however they are placed after any Soviet entries for that turn, so the Kradschützen starting locations are constrained by Soviet arrivals (see reinforcement arrival above). The Stab enters with the last company or turn 5 whichever is later
The KV-1 and KV-2 give German non armoured companies a -3 morale penalty instead of -2. The KV's do not get any bonus for being in cover (crews already think they are invulnerable which is why they are 10 morale). Most of the KV's lacked AP ammo, so may only fire HE.
The yellow dashed line is the German bomb line. German planes may only make ground attacks to the east of the line. They may not make any attacks if there are German tanks to the east of the line. (One German witness noted there was no German airpower over the battlefield but there was air activity against troops moving up, this is a mechanism to simulate this)
Luftwaffe Air Support
Each turn roll 1d6 on a 4-5 the Germans get a Bf-109F fighter. On a 6 they get a Bf-109F fighter and a Ju-87B Ground Attack plane
VVS Air Support
Each turn roll 1d10, on a 10 the Soviets get air support. Roll another 1d10. 1-3: I-16 or LaGG-3 fighter; 4-7 I-16 or LaGG-3 light attack, 8: Il-2 Attack; 9: LaGG-3 light attack and I-16 Fighter and 10: Il-2 Attack and LaGG-3 fighter
Victory Conditions
For a standard victory the Soviets must have a KV in good morale touching road XY at the end of the game. For a decisive victory a KV must be touching the road and there must be a KV, or 4 other Soviet tanks (T-28, T-26, OT-26 or BT) wholly in Rossienie in good morale. For a marginal victory the Soviets must hold two BUA's in out of: Kazarniske, Pakautai, Liauberiske or Girdaiciai
For a marginal victory the Soviets must fail in their victory conditions. For a standard victory the Germans must destroy all KV's, force them back over the bomb line, or demoralise them. For a decisive victory the Germans must make their standard victory conditions and get 3 stands, in good morale, within 6" of point B at the end of the game.
To hold a BUA the Soviets must have at least one stand in good morale wholly within the BUA and the Germans must not have any stands in good morale wholly within
Good morale means NOT shaken and NOT demoralised
Historical Outcome
The attack lasted all day, and elements of the 114 Schützen Regiment may have broke an ran when confronted with the KV's (depends on who's account you read). The Soviets did not make it in to Rossienie and had to fall back as evening fell as the tanks were out of fuel. One KV did make it to the road XY (actually it was further up the road off table) which cut off supplies to the Northern bridgehead. The Germans had great difficulty destroying it, and the KV held up the advance for nearly 48 hours.
References
3rd Mechanised Corps: http://mechcorps.rkka.ru/files/mechcorps/pages/3_meh.htm - link defunct
3rd Mechanised Corps: AMVAS site similar to the above but in English: http://www.armchairgeneral.com/rkkaww2/formation/mechcorps/3mk.htm
6 Panzer Division: http://niehorster.orbat.com/011_germany/41_organ_army/41_div_pz-06.html
Initial Period of the War on the Eastern Front by David Glantz
KV Technical History & Variants by Neil Stokes
KTB 6 Panzer Division: http://www.wwii-photos-maps.com/ - use the FTP site linked (Big tanks to Alan McCoubrey for the translation)
Lithuanian Article on the Battle: http://www.rytufrontas.net/e107_plugins/content/content.php?content.58 - link defunct
Panzers of the Eastern Front edited by Peter Tsouras.