Second Sinyavino Offensive
20/10/41
STAVKA directive 002984 dated October 14, ordered the troops of the Leningrad Front to attack towards Sinyavino to surround and destroy German forces to the north of Leningrad and to lift the siege. The main attack was to be by the 55th Army, with a force of five infantry divisions and two armoured brigades, which would cross the Neva River near Nevskaya Dubrovka then and advance in towards Sinyavino from the west. From the west the 54th Army was to break through the German defences and advance in the direction Sinyavino to link with the 55th Army.
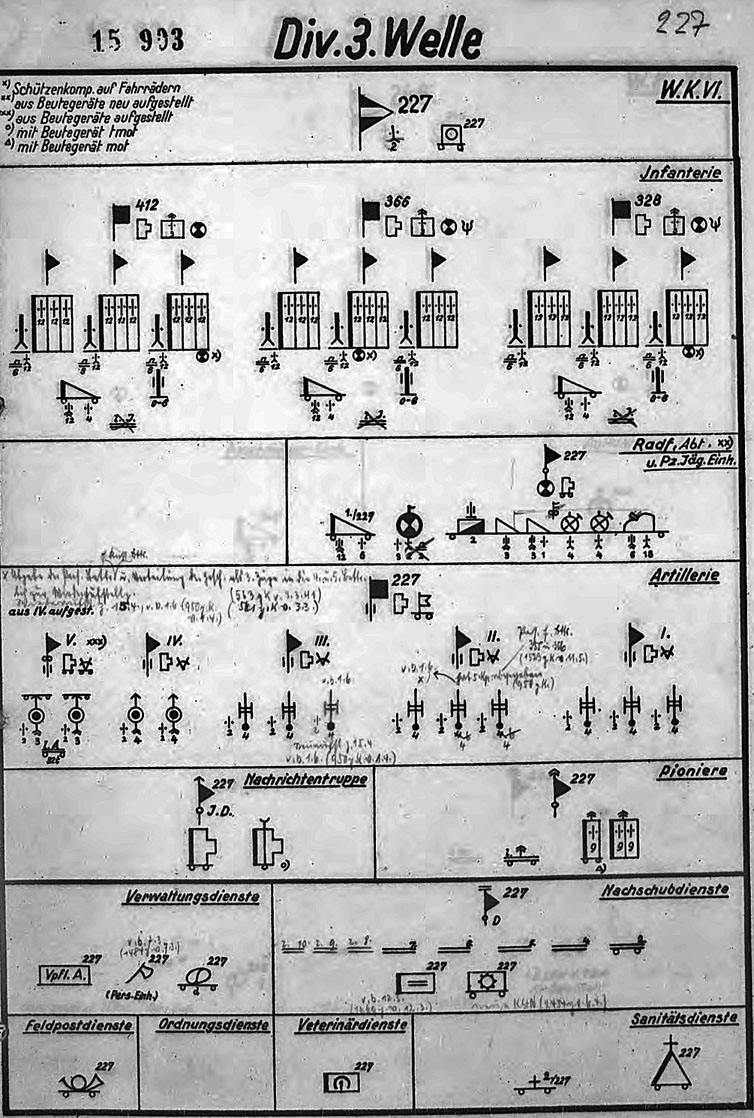
The scenario depicts the main thrust of the 54th army against the newly arrived 227 Infantry Division, freshly deployed from occupation duties in France
Details of the battle are scanty, so the following scenario has a fair amount of educated guesswork
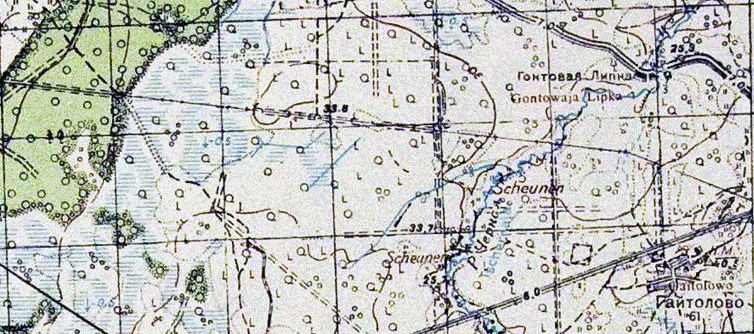
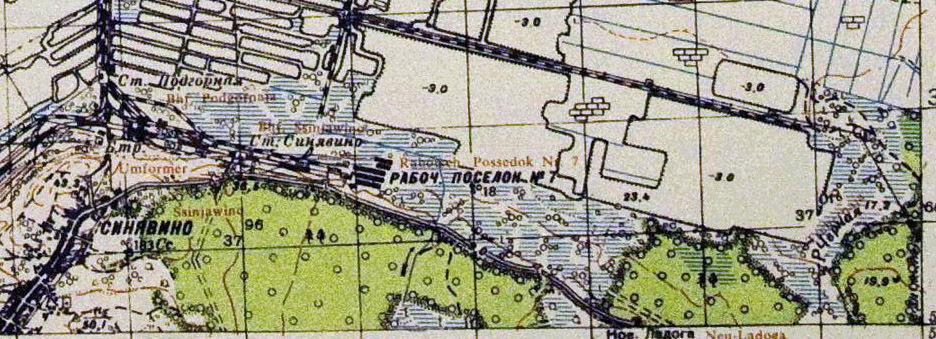
Soviet 30's map of the Battlefield. From http://www.wwii-photos-maps.com/. SSinjawino is the German transliteration of Sinyavino.
Map and Order of Battle
German Deployment
The I & II Btl 366 Infanterie Regiment are deployed in the zone delineated by pink dotted lines. The Regiment Stab must be deployed in a BUA of Workers Settlement No.7
Stoss Gruppe 277 Radfahr Abt is a reinforcement turn 8. It arrives in column down road A, Each stand entering after the first has it move reduced by 3" for every stand that went before. Alternatively on turn 9 stands may enter deployed within 12" of point A or in convoy along track D or a a combination of both. The German player may choose to delay their reinforcements to a subsequent turn.
All Germans stands starting on table, unless deployed in the bog (including on roads and tracks through the bog) are entrenched (-3 cover)
The Germans have 40" of barbed wire deployed within the I & II Btl 366 Infanterie Regiment deployment zone.
Soviet Deployment
Most Soviet forces start on the table in the deployment zones shown on the map. If the player wishes troops may enter the zone from off table in turn 1
The 2nd Battalions of the 16th and 122nd Tank Brigades form their 2nd Echelon and enter the table on turn 3. The 16th TB enters down track C in convoy. The 122nd TB enters in convoy down road B. Each stand in convoy entering after the first has it move reduced by 3" for every stand that went before
Terrain
The map depicts a 5ft x 8ft table if playing at 1" = 50m
The terrain is a cold soggy mess. The "open ground" is a mix of scrub, small stands of trees and tree stumps. Max visibility, including along roads and tracks is 12". Tracked vehicles move at half speed, wheeled vehicles and man-handled guns move at quarter speed
The pale blue areas are peat bog. Max visibility, including along roads and tracks is 12". The bog is impassable to vehicles and man handled guns. Foot stands move at half speed
The green areas are mixed coniferous and deciduous woods. Max visibility down roads and tracks in the woods is 6". Stands on the roads and tracks get +1 cover. Foot movement through the woods is unimpeded. Movement of vehicles and man handled guns is prohibited.
The grey areas are wooden BUA, giving -2 cover. There are no ROF penalties for any stand firing from within.
The red line is a road
The green dashed lines are tracks. They have no game effect except to allow stands thereon to ignore movement penalties for the surrounding terrain
The blue line is a boggy stream. All stands take a BMA to cross
The brown dashed line is a ridgeline. It breaks LOS and allows AFVs the hull down bonus vs all fire that crosses the ridgeline
Special Rules
The game lasts 12 turns with a 50% chance of a 13th rolled at the end of the 12th turn
For the first two turns the Soviets are firing an artillery programme. This means that all stands in the I & II Btl 366IR spend those two turns suppressed. The mortars and infantry guns on the Soviet OB many be called as normal during the bombardment
Also for the first two turns all German artillery is -2 to be called due to a combination of counter battery fire and air attacks on artillery positions. (this is not cumulative with being suppressed)
Some of the Soviet OB is noted as "double" stands. They represent c100 men rather than the standard 50. These for the most part operate as standard stands, however they get TWICE the shooting dice of a normal stand in most shooting situations (ie 2 for an infantry stand and 4 for an MMG stand). They still only get one extra for op fire (so 3 and 5 dice respectively). Note that they get an experience boost to make them harder to kill.
The double stands is an attempt to keep the number of stands on the table down to make the game more manageable. Players could go for the full OB, which is noted at the end of the OB page
Victory Conditions
For a decisive victory Soviets need to capture point A and keep a route to it along a road and/or track free of German stands
If they reach point X and a route is free it is a marginal Soviet victory
If they reach point Y and a route is free it is a draw
Any other result is a German victory
To hold a point there must be at least one Soviet stand in good morale within 6", and no German stands in good morale within 6". Points are measured from the centre of the main road
A free route is one with no German stands in good morale touching a track or road where the route passes
Good morale means not shaken or demoralised
References
References are somewhat sparse
Map of the operation: http://www.armchairgeneral.com/rkkaww2/maps/1941NW/Leningrad/2nd_Sinyavino_Operation_Oct20_28_41.jpg
Brief description of the fighting: http://worldoftanks.ru/community/history/battles/sinyavino_operation_1942
Details of the 16th Tank Brigade: http://blokada.otrok.ru/library/volhov/4.htm
Kriegsgliderung 227ID May 41 - this was before the 10.5cm SP's were added