Encounter on the Solarino-Floridia Road
11/7/43
V1.1
The Allies landed on Sicily on the 10th of July. Initially there was little resistance to the British landings, there was some scrappy fighting with the Italians, but for the most part the British made their objectives. On the 11th the Axis forces started to react, while the British moved to expand their bridgehead. The British 13th Brigade of the 5th Infantry Division was tasked with pushing from Floridia to the town of Solarino along route 124. Coming the other way was Gruppo Mobile D, tasked with pushing through Floridia and relieving Syracuse beyond
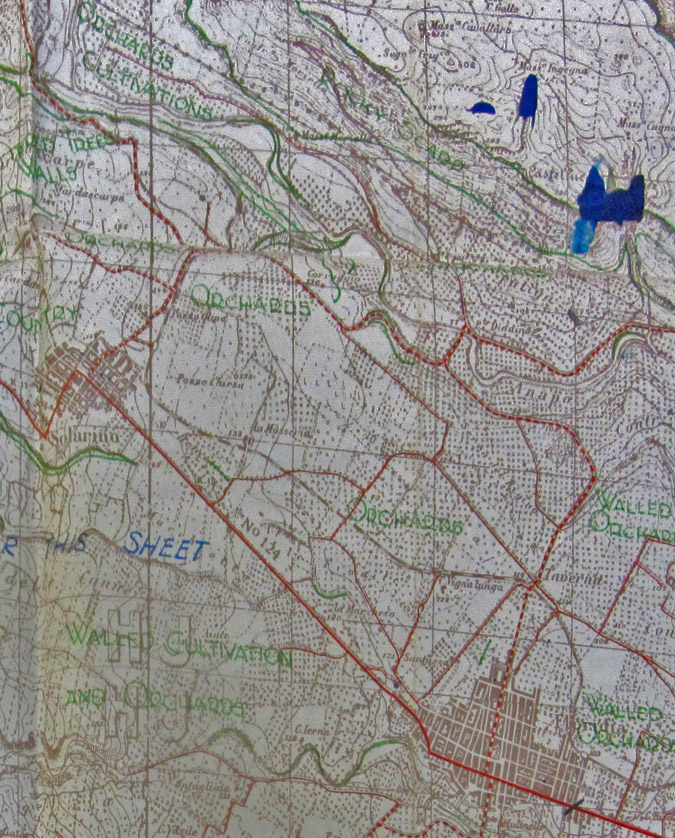
British wartime map of the battle area, from the 2nd Wiltshire's War Diary (WO169/10307)
Map and Order of Battle
British Deployment
British infantry battalions are set up on table in the areas indicated by the pink dashed lines.
C Company 44th RTR starts in the deployment zone of the 2nd Inniskillin Fusiliers. One of the Shermans is a reinforcement arriving on turn 4 at point D. It gets a free order at the end of turn three, but thereafter must be ordered normally.
The Brigade HQ is a special reinforcement. If any British BHQ is shaken or demoralised roll before every subsequent orders phase. On a 6-10 (d10) the Brigade HQ can be given an order and arrives at point D in the next turn.
Axis Deployment
The 75° Reggimento di Fanteria is deployed in the area delineated by the pink dashed lines
Gruppo Mobile D is deployed in column along route 124. Its leading stand may be as far southeast as point X. All stands start mounted in their transport, towed guns are limbered or portee'd
Terrain
The table is 8ft x 5ft if playing 1" = 50m. The top of the page is north
The open terrain is a patchwork of small fields. To emulate this all open ground is considered open blocking terrain with a max visibility of 12"
The green areas are orchards. They are open blocking terrain with a max visibility of 6" within. Orchards do not give cover.
The sandy area is dominant rocky heights. They are impassable to wheeled vehicles and man handled guns. Tracked and half tracked vehicles move at 1/4 speed within. Personnel stands move at 1/2 speed within. As this area is elevated stands within can see (and be seen) over all other terrain except BUA and ridgelines within the sandy area. The open blocking terrain does not effect stands in the sandy area when looking out over the rest of the table or when being spotted from the rest of the table.
The grey square areas are BUA. The simple town fighting rules are in effect. The BUA give +2 cover. The small BUA at Taverna can only hold a single personnel stand (no towed guns)
Green dotted lines are boundaries. These are roughly 1/3 each: tree lines, low stone walls and fences. Tree lines break LOS unless a stand is touching and give +1 cover. Low stone walls break LOS between personnel stands and Class 1 guns unless a stand is touching the wall. They do not break LOS to or from vehicles or larger guns. Personnel stands adjacent to the wall, get +2 cover for direct fire crossing the wall. The fences have no game effect and in effect act as gaps in the boundary.
Red lines are roads. The black dotted line is a railway which has no game effect. LOS down the roads/railway is limited to 12" except for the long straight of route 124 where LOS extends down the entire length. All roads and railways are edged by boundaries similar to the green dotted lines. Stands on the road or railway are assumed to be adjacent to both sides.
Blue lines are streams or rivers. Where they are bounded by brown dotted lines they are impassable to vehicles; impassable to artillery and take a BMA for personnel to cross. The banks of the streams provide +2 cover verses direct fire (only from stands that are not in the stream). The streams are about 75% tree lined. The stream and the tree lines on both sides are considered one obstacle. Tree lines are treated in same way as those noted under boundaries above.
Brown dashed lines are ridgelines. They break LOS. If an AFV is adjacent to a ridgeline it gets the +2 hull-down bonus vs all fire that crosses the ridgeline (however see below). This is only applicable outside the yellow sandy area (within the area the slopes are too steep). The dark brown line is higher than the lighter lines and stands touching the dark brown line can see over the light brown lines. Stands touching the light brown lines do not get the hull down bonus vs stands touching the dark brown line. Stands in the sandy area can see (and be seen) over all other terrain except BUA and the ridgelines within the sandy area.
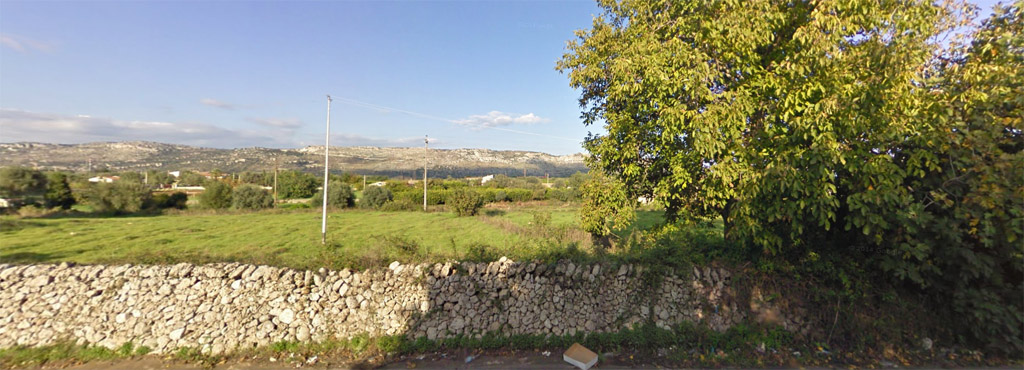
Modern (2008) picture of the terrain east of Solarino taken from route 124 (Google street view)
Special Rules
The game is 11 turns long with a 50% chance of an 12th, rolled at the end of turn 10
The 2nd Cameronians may not be moved out of their original deployment area
The stands of 75° Reggimento di Fanteria, except the regimental commander, may not be ordered to move until turn 3 or until any stand, not in the sandy area, has spotted a British stand, whichever is later.
Gruppo Mobile D must move at least one entire company towards any part of Floridia at least a BMA each turn unless any stand is in LOS and 12" of a British stand in good morale. It may stop doing this after at least two stands are lost.
I Battaglione 75° Reggimento di Fanteria starts the game shaken
All stands in square brackets stat the game "trucks to the rear"
Victory Conditions
The British need three victory points to win, two points is a draw, otherwise they lose
Victory locations are: Solarino, Junction Y and ridgeline AB. Solarino is worth 1 Victory Point, junction Y 1 VP and ridge AB 2 VP. These VPs are calculated at the end of the game. The British gain a VP if the Italians do not get a stand in good morale in any BUA of Floridia at the end of any turn (ie they are not required to hold on until the end of the game)
For the victory point the British must have a stand in good morale in any BUA of Solarino
For the victory point the British must have at least one stand, and the only stands, in good morale within 6" of the centre of junction Y
For the victory points the British must have at least one stand, and the only stands, in good morale touching ridgeline AB
Good morale means not shaken and not demoralised
Historical notes on the Order of Battle
The prevalence of PIAT is debatable. In the war diaries there is mention that the PIAT must be kept under the control of an NCO before embarkation to keep it from prying eyes. However none can be seen in the detailed loading plans, whereas ammo for Boys ATR is present in some loading plans.
The British struggled to get their motor transport up from the beaches hence the lack of AT guns, mortars and carriers in the OB. The exact extend of this is unclear.
References
2nd Cameronian's War Diary (WO 169/10189)
2nd Royal Inniskilling Fusiliers' War Diary (WO 169/10233)
2nd Wiltshire's War Diary (WO 169/10307)
44th RTR War Diary: http://www.warlinks.com/armour/3_cly/3cly_43.php
52nd Anti Tank Regiment's War Diary (WO 169/9616)
Battaglia di Solarino: http://www.siracusanews.it/node/52313
Italian OB, captured by the British (WO208/4536). This agrees quite closely with: https://fr.wikipedia.org/wiki/Ordre_de_bataille_des_forces_militaires_Alli%C3%A9es_et_de_l%27Axe_lors_de_l%27Op%C3%A9ration_Husky#Ordre_de_bataille_de_l.27Axe
Mobile Groups: http://www.modellismopiu.it/modules/news/article.php?item_id=1031
Napoli Infantry Division: https://groups.google.com/forum/#!msg/it.cultura.storia.militare/UA70A3om6Rg/QjEHwK5v3rQJ
Operazione Husky: http://www.milistory.net/forum/operazione-husky-vt8617-29.html