Chouïgui
1/12/42
v2.1.2
Pictures of the Game (from v1.0)
Pictures of the game (from V2.1)
The first phase of the battle for Tunisia was a race against time. Could the meagre Allied columns push forward fast enough to reach Tunis before the Germans could put a coherent defence in place? At the end of November the British 11th Infantry Brigade was at the tip of the spear supported by elements of the US 1st Armored Division around a the town of Tebourba. Unfortunately time had run out for the allies and the Germans were coming.
The Germans planned a concentric attack on Tebourba using the newly arrived elements of 10 Panzer Division and 501 Panzer Abt, the latter armed with Tigers. Group Luder from the north west, Group Hudel from the north east, Group Koch from the south and Group Djedeïda from the west. The plan was to pinch off the allied forward elements and to prevent then retreating west to Medej al Bab. The counter offensive started on the 1st of December
The scenario depicts the attack from the north by Groups Hudel and Luder. Guarding the north flank of Tebourba was Blade Force stationed around the village of Chouïgui: an interesting mix of British and US forces. The Germans need to eliminate Blade Force before pushing on to Tebourba.
Note the scenario depicting the attack on Tebourba the next day can be found here
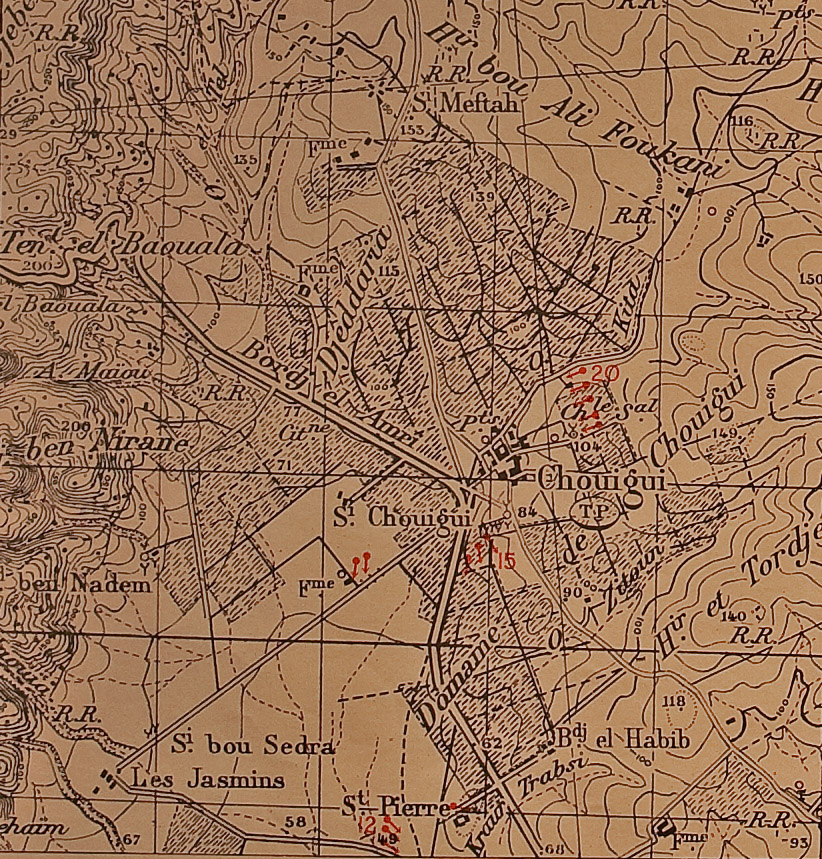
1943 British map of the Area. From: https://files.secureserver.net/0fCwdamNAEIvKD via http://www.wwii-photos-maps.com/
Map and Order of Battle
Allied Deployment
1/1 Armoured and B Coy 1RB must deploy within 12" of Chouigui
Blade Force HQ and B Squadron 1st Derbyshire Yeomanry must deploy in the olive grove around point F. The HQ may deploy in the BUA adjacent.
17/21st Lancers are a reinforcement arriving turn 5 between points E and F. They are not obliged to enter the table within 12" of a German AFV or AT gun and may enter outside the designated area up to 18" from the nearest German stand along edge GE. They must enter between E & F if no German AFV or AT guns are within 12".
German Deployment
Most German forces enter turn 1. Group Luder enters between points A & B, Group Hudel between C & D.
KG Stab Group Hudel enters turn 2 between C & D and 1 Kp 90 PzJgr Abt follows on turn 3.
Terrain
The map depicts a 5'x8' table if playing 1" = 50m. North is towards the top of the page
Red lines are roads, the thicker, darker line is tarmac, the others are tracks
Blue lines are shallow streams. They are no impediment to most stands but wheeled vehicles (not half tracks) take a BMA to cross. Foot stands (but not towed guns) get +2 cover if in the stream. Where streams are tree lined the stream and trees count as a single obstacle.
Dotted dark green lines are tree lines or lines of scrub. They break LOS except to stands adjacent and give light cover.
The green area at point F is an olive grove. Treat it as a light wood.
The brown dashed lines are ridgelines. They break LOS. Vehicles touching get hull down against fire crossing the ridgelines. The thicker, darker lines are higher than the lighter lines. Stands touching the darker lines can see over all intervening cover (except another dark ridge line), unless a stand is behind and touching a BUA. Stands touching light brown lines do not get the hull down bonus vs. stands touching the dark brown lines.
The light green area (near point A) is a rugged scrub, impassable to vehicles and man-handled guns. Foot stands proceed at half speed.
The lighter green areas are vineyards. Personnel within get -1 cover. Personnel and un-armoured vehicles within move at half speed. It is not possible to man-handle guns within. Spotting from personnel stand to personnel stand (or to a low AFV such as a Dingo or carrier) is limited to 2". Spotting to or from a "real" AFV is limited only by the normal spotting rules.
The grey squares are mud brick BUA (-3 cover) the simple town fighting rules are in effect. The smaller squares can only hold a single personnel or towed gun stand
The church in Chouigui has a tall steeple. If either side has exclusive occupancy of the BUA, and has a personnel stand within, it may spot (but not shoot) over all the tree lines within 12" of the BUA
Air Support
The Luftwaffe had air superiority during the battle and the air was thick with Stukas, the closest base being less than 7 miles away. Conversely the nearest allied base was over 100 miles away. The Allies made some fighter sweeps but the distance of the bases meant these were sporadic.
Each turn the German player rolls d10. 1-8, no planes: 9-10: Stuka & FW-190 or Bf-109G fighter.
Each turn the allies roll 1d10. On a 10 they get a P-38 Lightening fighter. Allies places planes first.
Special Rules
The game lasts 9 turns with a 50% chance of a 10th, roll at the end of turn 9
No allied unit may have a movement order turn 1.
The Tiger represents a single real world tank, hence its Green rating.
Victory Conditions
The Germans are aiming to annihilate the Allied forces and to capture the road exits F (ie two objectives)
All victory conditions are calculated after the end of the game
If the Germans make all two objectives they win. If they make one its a draw, if they make none the game is an allied victory
To capture point F the Germans must have the only gun armed AFVs (ie carriers, Dingoes & 251's do not count) in good morale wholly within 18". (the 18" is measured from the centre of the road where it leaves the table)
To "annihilate" the enemy the Germans must achieve a 2:1 kill ratio. Only gun armed AFVs (ie not carriers, Dingoes & 251's) count. For example if the Germans lose 4 tanks they must kill at least 8 allied tanks to win
Good morale means not shaken and not demoralised
References
See the Tebourba scenario