The Second Rearguard at Ptolemais
13/4/41
V1.1 - small tweak after play test
German forces invaded Greece and southern Yugoslavia from Bulgaria in the
first week of April 1941. Following the collapse of resistance in Yugoslavia,
the left flank of the Vermion line held by Greek and British Commonwealth forces
became exposed. A new plan intended that Commonwealth forces would hold off
Germans forces in western Macedonia, until non-motorised Greek infantry units
had withdrawn on foot from Mount Vermion to Mount Siniatsiko, and a new
defensive line had been formed between Mount Olympus and the Aliakmon River.
On the morning of 10 April, the German XL Panzer Corps advanced from Monastir to
seize the Greek city of Florina, 13 km (8.1 mi) south of the Yugoslav border,
utilising the Monastir Valley (or "Monastir Gap"). Leibstandarte SS Adolf Hitler
(LSSAH), and accompanied by 9. Panzer Division, advanced further south and
occupied the town of Vevi on 11 April. The German 73rd Infantry Division
followed behind LSSAH and attacked to the west, to widen the front of the German
breakthrough. Confronting the Greek Cavalry Division in an action at Pisoderi
Pass, the 73rd failed to make any progress.
A mixed Australian-British-New Zealand-Greek formationknown as Mackay Forcewas
assembled hastily. Its taskin the words of the British Commonwealth commander
in GreeceGeneral Henry Maitland Wilson, was to "stop a blitzkrieg down the
Florina Valley." The force was named after its commander, the Australian Major
General Iven Mackay, who deployed his headquarters in Perdika.
(from: http://en.wikipedia.org/wiki/Battle_of_Vevi_(1941) )
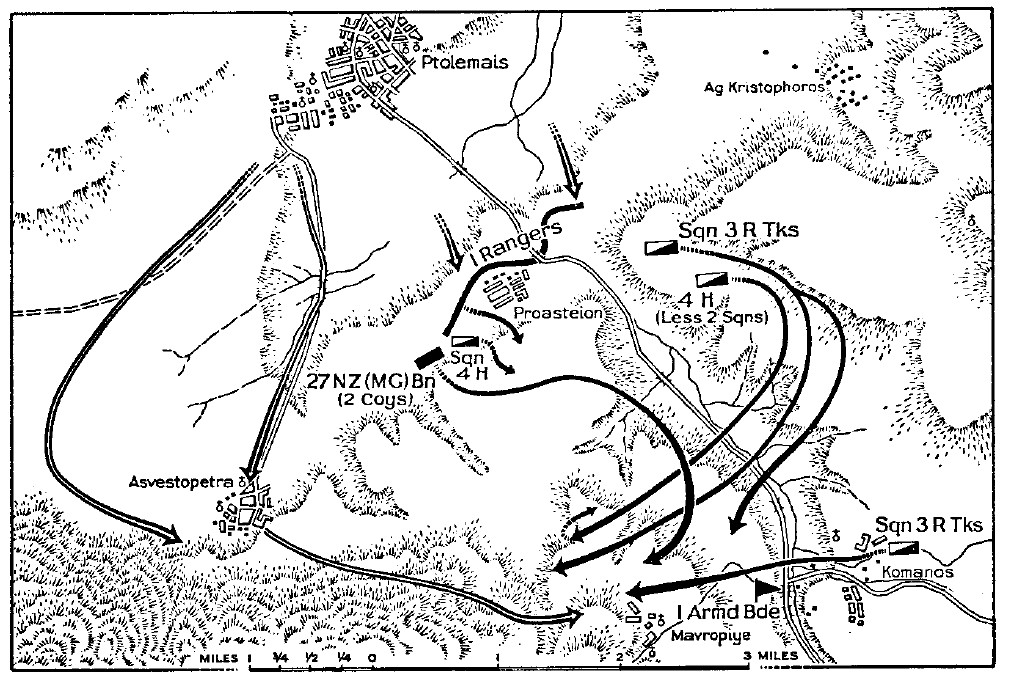
Mackey force did not stop the Germans and the Commonwealth forces were obliged to fall back. Several blocking positions were overcome by the attackers until on the afternoon of the 13th April the last position was reached. 1st Armoured Brigade has skirmished with 9 Panzer Division in the morning and then pulled back to a position just south of Ptolemais for a final stand to allow the rest of Mackay force to escape south. The scene was set for the biggest (and only) tank battle of the Greek campaign. Unfortunately for the Commonwealth forces the Germans had managed to hook around their left flank and were attacking 3km behind the front line
Battle map from: http://www.awm.gov.au/collection/records/awmohww2/army/vol2/awmohww2-army-vol2-ch3.pdf
Map and Order of Battle
Commonwealth Deployment
Most Commonwealth units are deployed in the areas indicated by the pink dashed lines. The Rangers and 104th AT share a deployment zone.
HQ 2nd RHA may deploy in the zone of either subordinate battery
HQ 1st Tank Bde is deployed within 9" of point D
B Squadron 3rd RTR is a reinforcement. It may enter turn 1 at point C or turn 2 at point D
C Squadron 3rd RTR is a reinforcement. It may enter turn 3 at point C or turn 4 at point D
HQ 3rd RTR is a special reinforcement. It will enter on the turn after any squadron of 3rd RTR goes shaken or demoralised down point C or D
German Deployment
59 Kradschützen Btl may enter turn 1 or any time thereafter between points A & B
I/33 Panzer Abt starts on table. It is deployed along the track in column between points E and F. Stands which cannot fit on table will enter in column at point E on turn 2. Each stand after the first loses 3" of its move for each stand that preceded it this turn. The Zug 9 Aufklärungs Abt is on the track between points F and G
Terrain
The map its 8ft x 5ft if playing 1"=50m (I condensed the ground scale a little to get the game to fit my table size. It would be better on a 6ft wide table, scaling the length accordingly). The terrain in the south is mountainous and more or less slopes down to an boggy open flat plain in the north of the map. All wheeled vehicles and man-handled guns (not halftrack) not on a road or track move at half speed.
Red lines are roads
The red dotted line is a track. it has no game effect other than it counts as open terrain for wheeled vehicles and it its eligible to be used for travel march orders
The black dashed line is a railway. it has no game effect
The sand coloured dashed lines are ravines, the blue lines are streams in ravines, for game purposes they are treated the same. They are impassable to wheeled vehicles and man-handed guns. They are impassable to tracked vehicles and halftracks unless there is a halted engineer stand at the crossing point when it takes 2BMA to cross. Inf takes a BMA (1/2 BMA to enter, 1/2 BM to leave) to cross, or may move along the ravine at half speed. Personnel stands within gain +2 cover vs non IDF fire. Max visibility along a ravine or steam is 6"
The treble black lines are bridges. Bridge H will take tanks and vehicles. Bridge I will only take personnel, manhandled guns and motorcycles. (There are also bridges where the roads and rails cross ravines and streams, they can take all traffic)
The green dotted lines are scrubby tree-lines, that follow dry (?) stream beds. They break LOS (but see below) unless a stand is adjacent and give +1 cover. Where the lines flank a stream or ravine they are treated as two distinct lines of cover but stands in the ravine are assumed to be adjacent to both. Scrub lined ravines count as cover for stands when being spotted from air.
Brown dashed lines are ridgelines. For the most part they break LOS. Those south of the double grey line are too precipitous to provide hull down positions. Those north of the grey line provide touching AFVs +2 cover vs most fire that crosses the ridge. The thick brown lines are higher than the thinner lines. Stands touching the thick lines can see over all terrain with the exception of: a) brown dashed lines not directly connected to them; b) any BUA; c) wood J. AFVs on thin brown lines do not get hull down bonuses when fired at from thick brown lines where the thick and thin lines are connected. Stands touching the thin brown lines can only see over the scrubby tree lines. Note the joining or ridges in the SW corner of the map
The green areas are forests. Impassable to vehicles and man-handled guns, 1/2 speed for foot troops
The yellow area is mountainous. Impassable to vehicles and man-handled guns, 1/2 speed for foot troops
The blue area is a small lake, impassable to all stands
The grey squares are BUA, there are strongly build and give +3 cover. The simple town fighting rules are in effect.
Air Support
The Luftwaffe was very active - each turn the German player rolls a d10: 1-7: no planes. 8: Bf-109E Fighter and Bf-110C fighter bomber. 9-10: 2 Ju-87B Stuka
Special Rules
The game lasts 8 turns with a 50% chance of a 9th. Turn 8 is twilight. All spotting distances are halved and max visibility is 12". Turn 9 is dark: max visibility is 3". Spotting distances are halved or 3" whichever is smaller. The following night rules are in effect (pg 93): 39.1.2 (2nd paragraph only); 39.1.4 and 39.1.7
All transports on the OB in brackets start "trucks to rear"
Victory Conditions
To win, at the end of the game the Commonwealth must have destroyed at least half the number of German tanks compared to the number they have lost: eg if the Brits have lost 8 tanks that must have destroyed 4 or more German tanks AND the Germans must not make their victory condidtions
For the Germans to win they must have at least two stands in good morale within 9" of point C or 3" of point D, AND the Commonwealth must not make their victory conditions
Any other result is a draw.
Good morale means not shaken and not demoralised.
The radius for points C & D are measured from the centre of the point where the road leaves the table
References
4th Hussars' War Diary: http://www.btinternet.com/~ian.a.paterson/WarDiaries/4th_Hussars/4thH1941.htm
9 Panzer Division, Leo Niehorster: http://niehorster.orbat.com/011_germany/41_organ_army/41_div_pz-09.html
Axis History Forum: http://forum.axishistory.com/viewtopic.php?f=50&t=172693&start=45
German Campaign in Greece: http://www.history.army.mil/books/wwii/balkan/20_260_3.htm
Gods were Neutral, Robert Crisp
Panzertruppen Vol 1, T Jentz
Rearguard Actions in the Florina Valley: http://www.awm.gov.au/collection/records/awmohww2/army/vol2/awmohww2-army-vol2-ch3.pdf
To Greece: Official History of New Zealand in the Second World War 193945: http://www.nzetc.org/tm/scholarly/tei-WH2Gree-c9-9.html
Years of Defeat, Martin Farndale