Second Day at Tebourba
2/12/42
v2.1
The first phase of the battle for Tunisia was a race against time. Could the meagre Allied columns push forward fast enough to reach Tunis before the Germans could put a coherent defence in place? At the end of November the British 11th Infantry Brigade was at the tip of the spear supported by elements of the US Combat Command B of the 1st Armored Division around a the town of Tebourba. Unfortunately time had run out for the allies and the Germans were coming.
The Germans planned a concentric attack on Tebourba using the newly arrived elements of 10 Panzer Division and 501 Panzer Abt, the latter armed with Tigers. Group Luder from the north west, Group Hudel from the north east, Group Koch from the south and Group Djedeïda from the west. The plan was to pinch off the allied forward elements and to prevent then retreating west to Medej al Bab. The counter offensive started on the 1st of December
The 1st was a day of mixed blessings for both sides. The Groups Luder and Hudel routed elements of Blade Force from Chouïgui to the north of Tebourba and then pushed south towards the town and the "Tebourba Gap" (Point I on the map) The main assault on the Tebourba gap was defected by British artillery firing as anti-tank guns. This was followed by a night time attack which also failed. Group Koch had several inconclusive skirmishes with the East Surreys around El Bathan but did succeed in infiltrating some troops of 10 Kp 5FJR behind the town were they briefly interdicted the road to Medjez el Bab (SW of point I) before being driven off by US tanks. In the east Group Djedeïda made very little progress against the staunch defence of the 2nd Hampshire Battalion which kept the Group several kilometres from the intended objectives.
The battle was renewed on the 2nd with the Allies on the offensive. The Germans were fairly passive in the morning, apart for incessant Stuka attacks, recovering from their failed night time offensive. The day's action starts with the unsupported charge of 1/13th Armored Battalion into the teeth of the German defences.
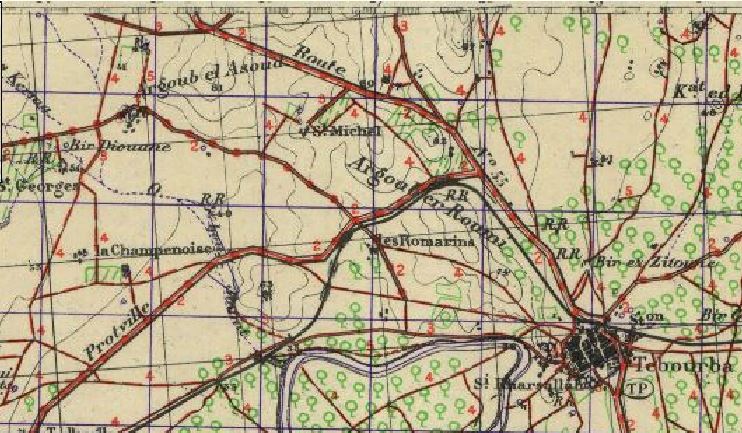
1942 map of the the battlefield - from http://www.bl.uk/onlinegallery/onlineex/maps/africa/4998570u19u1942.html
Map and Order of Battle
Allied Deployment
The HQ 11th Brigade starts just off table. It may enter the table up to 12" north of point I the turn after any subordinate BHQ is ether destroyed, shaken or demoralised
The 5th Northampton's, 457th Light Battery and the Troop of 321st Field Battery start within 12" of point I. The infantry are in foxholes (+2 cover). The artillery have slit trenches but the guns are not otherwise dug in. They get +2 cover vs. artillery and air attack but NOT against direct fire.
The HQ 1st East Surrey Battalion must start in any BUA or Tebourba.
C Coy 1st East Surrey Battalion is a reinforcement which enters any BUA of Tebourba from the south on Turn 7
B Echelon 1st E. Surreys starts in the area delineated by the pink dashed line. Although the OB only shows a single infantry stand it should be accompanied by 4-5 trucks representing the battalion's rear echelon. These trucks can not be used for transporting troops.
HQ plus one troop of 321st Field Battery, 9/13th Medium Battery and Battery of 94th Light AA must all be within 12" of Tebourba, and must all be north of the Medjerda River. They have slit trenches but the guns are not otherwise dug in. They get +2 cover vs. artillery and air attack but NOT against direct fire. There are special rules about these units, see below
1/13th Armoured Battalion enters the table turn 1, within 12" of point I. All light tank stands must enter on turn 1, no delay is allowed.
2/13th Armoured Battalion starts on the table in the area delineated by the pink dashed lines.
Company E 13th Armoured Regiment is a reinforcement on turn 3. It may be delayed to any subsequent turn. It arrives within 12" of point I.
All stands noted in brackets start "trucks to the rear"
German Deployment
KG Hudel starts in the area delineated by the pink dashed lines.
KG Luder starts in the vineyards delineated by the pink dashed lines. Any personnel stand may be deployed forward within 3" of either of the farms at La Champonaise.
KG Koch is a reinforcement and should be rolled for each turn. It arrives on a 9-10 on a d10. Roll before the orders turn. Once rolled it enters the table between points G and F
All stands noted in brackets start "trucks to the rear"
Terrain
The map represents a 5x8 table if playing 1"=50m, north is towards the top of the page
Red lines are roads, the thicker, darker lines are tarmac, the others are tracks. Where they are tree lined, stands on the road are assumed to be adjacent to both tree lines.
The black dashed line is a railway. It has no game effect. Where it is tree lined, stands on the railway are assumed to be adjacent to both tree lines.
The pale blue line is a shallow stream. It is no impediment to most stands but wheeled vehicles (not half tracks) take a BMA to cross. Foot stands (but not towed guns) get +2 cover if in the stream. Where stream is tree lined the stream and trees count as a single obstacle.
The thick blue line is the Mejerda river. It runs along a gully. It is impassable to vehicles and man-handled guns. Foot troops take a BMA to enter the river and a BMA to leave. Troops in the river can not shoot or be shot at by troops outside the river unless the troops outside are touching the river. Troops may not move along the river.
Dotted dark green lines are tree lines or lines of scrub. They break LOS except to stands adjacent and give light cover.
The brown dashed lines are ridgelines. They break LOS. Vehicles touching get hull down against fire crossing the ridgelines.
The dark green areas are olive groves. They are open blocking terrain they do not otherwise provide cover. Max LOS within the groves is 8".The olive groves are not thick enough cover to prevent air attacks. However if using the Simple Air Rules when attacking a target wholly within a grove the deviation roll is 8-10 rather than 9-10. AA guns may not fire at aircraft out of the groves.
The lighter green areas are vineyards. Personnel within get -1 cover. Personnel and un-armoured vehicles within move at half speed. It is not possible to man-handle guns within.
The grey squares are mud brick BUA (-3 cover) the simple town fighting rules are in effect. The smaller squares can only hold a single personnel or towed gun stand
Air Support
The Luftwaffe had air superiority during the battle and the air was thick with Stukas, the closest base being less than 5 miles away. Conversely the nearest allied base was over 100 miles away. The Allies made some fighter sweeps but the distance of the bases meant these were sporadic.
Each turn the German player rolls d10. 1-6, no planes: 8: Stuka, 9: Stuka & FW-190 or Bf-109G fighter. 10 Hs-129 + 37mm Anti-tank
Each turn the allies roll 1d10. On a 10 they get a Spitfire Mk V or P-38 Lightening (50% chance of each). The fighter may NOT strafe. Allies places planes first.
On each turn that the Germans do not get any fighters roll 1d10. On a 10 the Allies get an Auster I AOP. This can call any battery or troop of 9/13th Battery or 132 Field Regiment on a 1-7.
Special Rules
Game is 10 turns long with a 50% chance of an 11th turn (rolled at end of turn 10)
The Tiger represents a single real world tank, hence its Green rating.
No stand on the table may move turn 1, except 1/13th armoured. The ban on movement continues until either a stand of 1/13th shoots or a stand of 1/13th is shot at. All tanks in 1/13th must move at least a BMA so as to get closer to the on-table enemy each turn until they either shoot at the enemy or are shot by the enemy. Artillery fire and air attacks do not count as shooting for the purposes of this rule. In effect 1/13th is obliged to attack, once the attack is underway then other stands can move.
Troop of 321st Field Battery and 9/13th Medium Battery are firing in support of British forces to the west and south. They count as firing every turn. They must start facing the South East corner. They may not turn, move or engage the Germans on the table until a German stand is in LOS. They never engage stands on the table with IDF with one exception. They may be called by the Auster I of 651 Squadron.
Victory Conditions
All victory conditions are calculated after the last turn is finished
For a marginal victory the Germans must have cut off the forces in Tebourba. There must be a chain of stands a maximum of 12" apart from edge AD to the Medjerda River. The river and the edge must be within 12" and LOS of a any one of the stands making the chain. There must be no point that is out of LOS of all of the stands in the chain, thus they will have to be much closer in the olive groves where LOS is 4". Stands of the chain must be in good morale.
For a substantial victory the Germans must have the only stands in good morale within 12" of point I. They only need this condition for a substantial victory they do not need the marginal condition as well.
If the Germans make neither of their conditions it is a Allied marginal victory
If the Germans make neither of their conditions and there are no German stands in good morale within 12" of Point J and north of the Mejerda river then the allies have a substantial victory.
Good morale means not shaken and not demoralised
References
1 East Surrey War Diary (WO175/519)
1 East Surrey Battalion: http://www.queensroyalsurreys.org.uk/ww2/algiera_to_tunis/algiers_tunis004.html
4 Kp 7 Pz Regt report: http://forum.panzer-archiv.de/viewtopic.php?p=149490&sid=1084c1ff72b2e673dfffcc45bc70b9cf
5 Fallschirmjäger Regiment: http://www.fjr5.es/
5 Fallschirmjäger Regiment Attacks (Das Afrika Korps F. Kurowski pg: 207): http://wnlibrary.com/Portabel%20Documents/Das%20Afrika%20Korps%20-%20Erwin%20Rommel%20And%20The%20Germans%20In%20Africa%201941%20-%201943%20-%20Franz%20Kurowski.pdf
5 Northamptonshire War Diary (WO175/517)
10 Panzer Division Gliderung: http://www.yeide.net/Public/10thPanzerDivisionOOB.pdf
11 Infantry Brigade War Diary (WO175/196)
14th Fighter Group: http://raf-112-squadron.org/14thfghonor_roll42_43.html
457 Light Battery War Diary (WO166/7773)
501 Panzer Abt: http://www.vojna.net/portal/viewtopic.php?t=1264
Action at Tebourba (WO234/99)
Anton "Toni" Hafner - Bf-109 ace over Tunisia: http://www.luftwaffe.cz/hafner.html
Aviation Safety Network, Aircraft Losses 1942: http://aviation-safety.net/wikibase/dblist.php?Year=1942&page=52
Blade Force War Diary: http://www.ww2talk.com/forum/attachments/recce/52574d1307750493-blade-force-1942-nov-dec-war-diary-blade-force-pdf
British Armies in WW2 an Organisational History, Vols 1 & 3. David Hughes et al
Hs-129 in Tunisia: http://www.thescale.info/news/publish/hs129intunisia.shtml
Kampfgruppen: http://afrikakorps.roomforum.com/t2-kampfgruppe-nord-afrika
Northwest Africa: Seizing the initiative in the West (US Official History) chapter 17: http://www.ibiblio.org/hyperwar/USA/USA-MTO-NWA/USA-MTO-NWA-17.html
Tebourba Map 50K http://www.bl.uk/onlinegallery/onlineex/maps/africa/4998570u19u1942.html
Unarmed into Battle, HJ Parnham & EMG Belfield
USAAF Chronology: http://paul.rutgers.edu/~mcgrew/wwii/usaf/html/Dec.42.html